


 English
LILYGO T-QT C6
Version History:
| Version | Update Date | Update Description |
|---|---|---|
| T-QT-C6_MCU_V1.0 | 2023-12-20 | Initial version |
| T-QT-C6_MCU_V1.1 | 2024-03-27 | Added support for battery backplane |
| T-QT-C6_MCU_V1.2 | 2024-06-13 | Changed power management chip to SGM41562 |
| T-QT-C6_Battery_V1.2 | 2025-08-11 | Modified backplane pins, using 2-pin, 1.25mm pitch pin headers for battery connection, improving system stability |
Purchase Links
| Product | SOC | FLASH | PSRAM | Link |
|---|---|---|---|---|
| T-QT C6 | ESP32-C6 | 4M | 4M | LILYGO Mall |
Table of Contents
- Description
- Preview
- Modules
- Quick Start
- Pin Overview
- Related Tests
- FAQ
- Projects
- Resources
- Dependent Libraries
Description
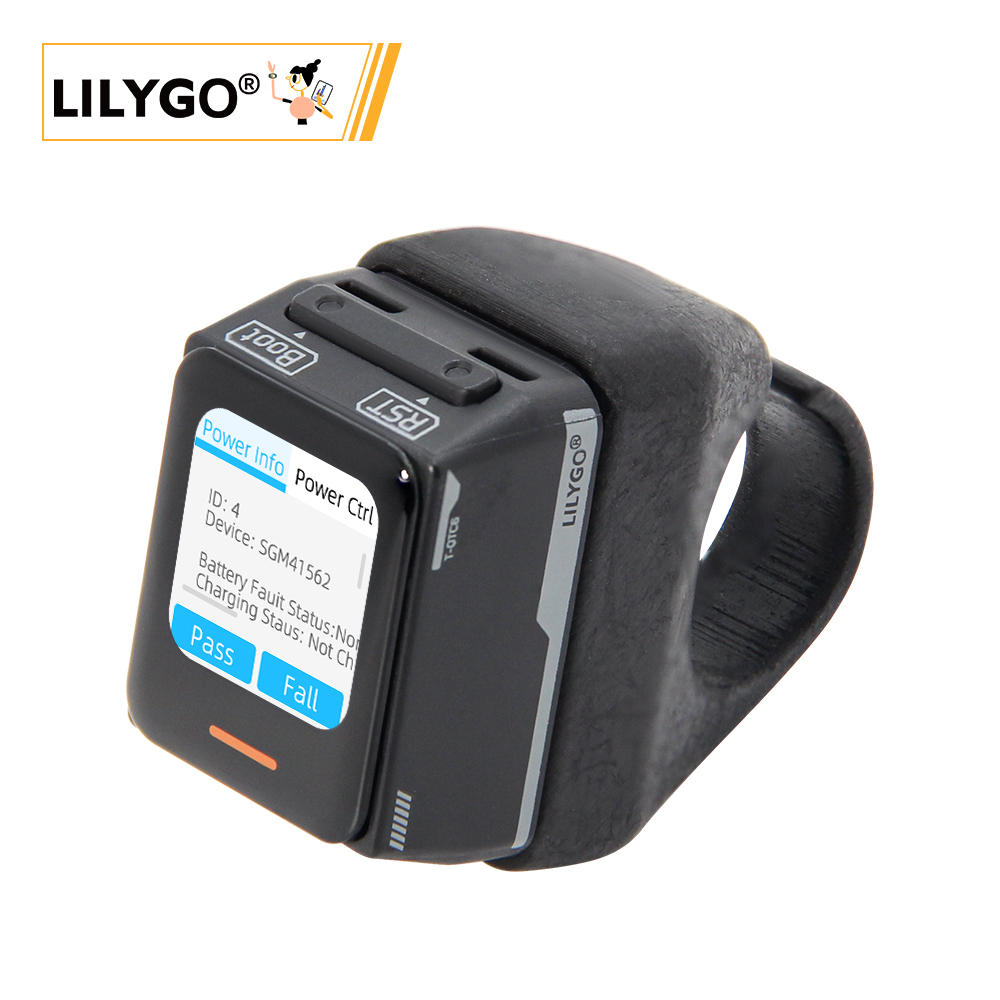
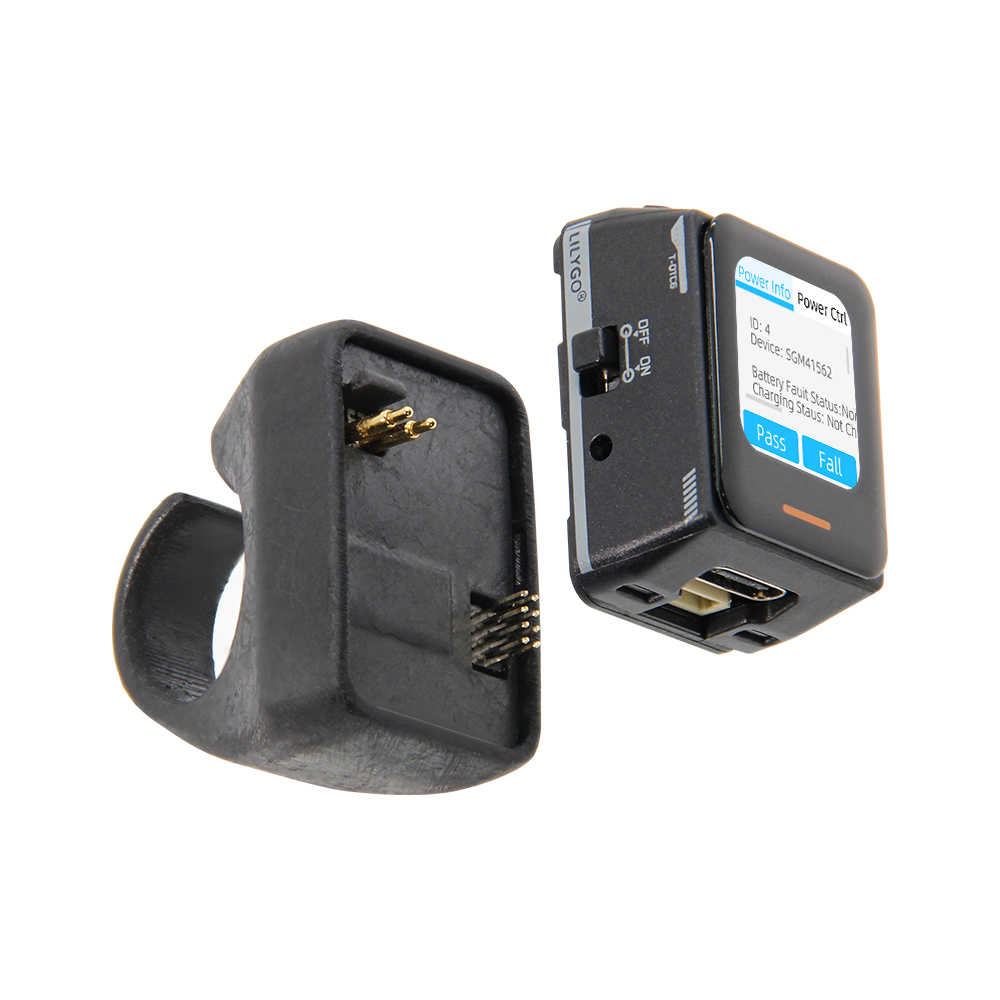
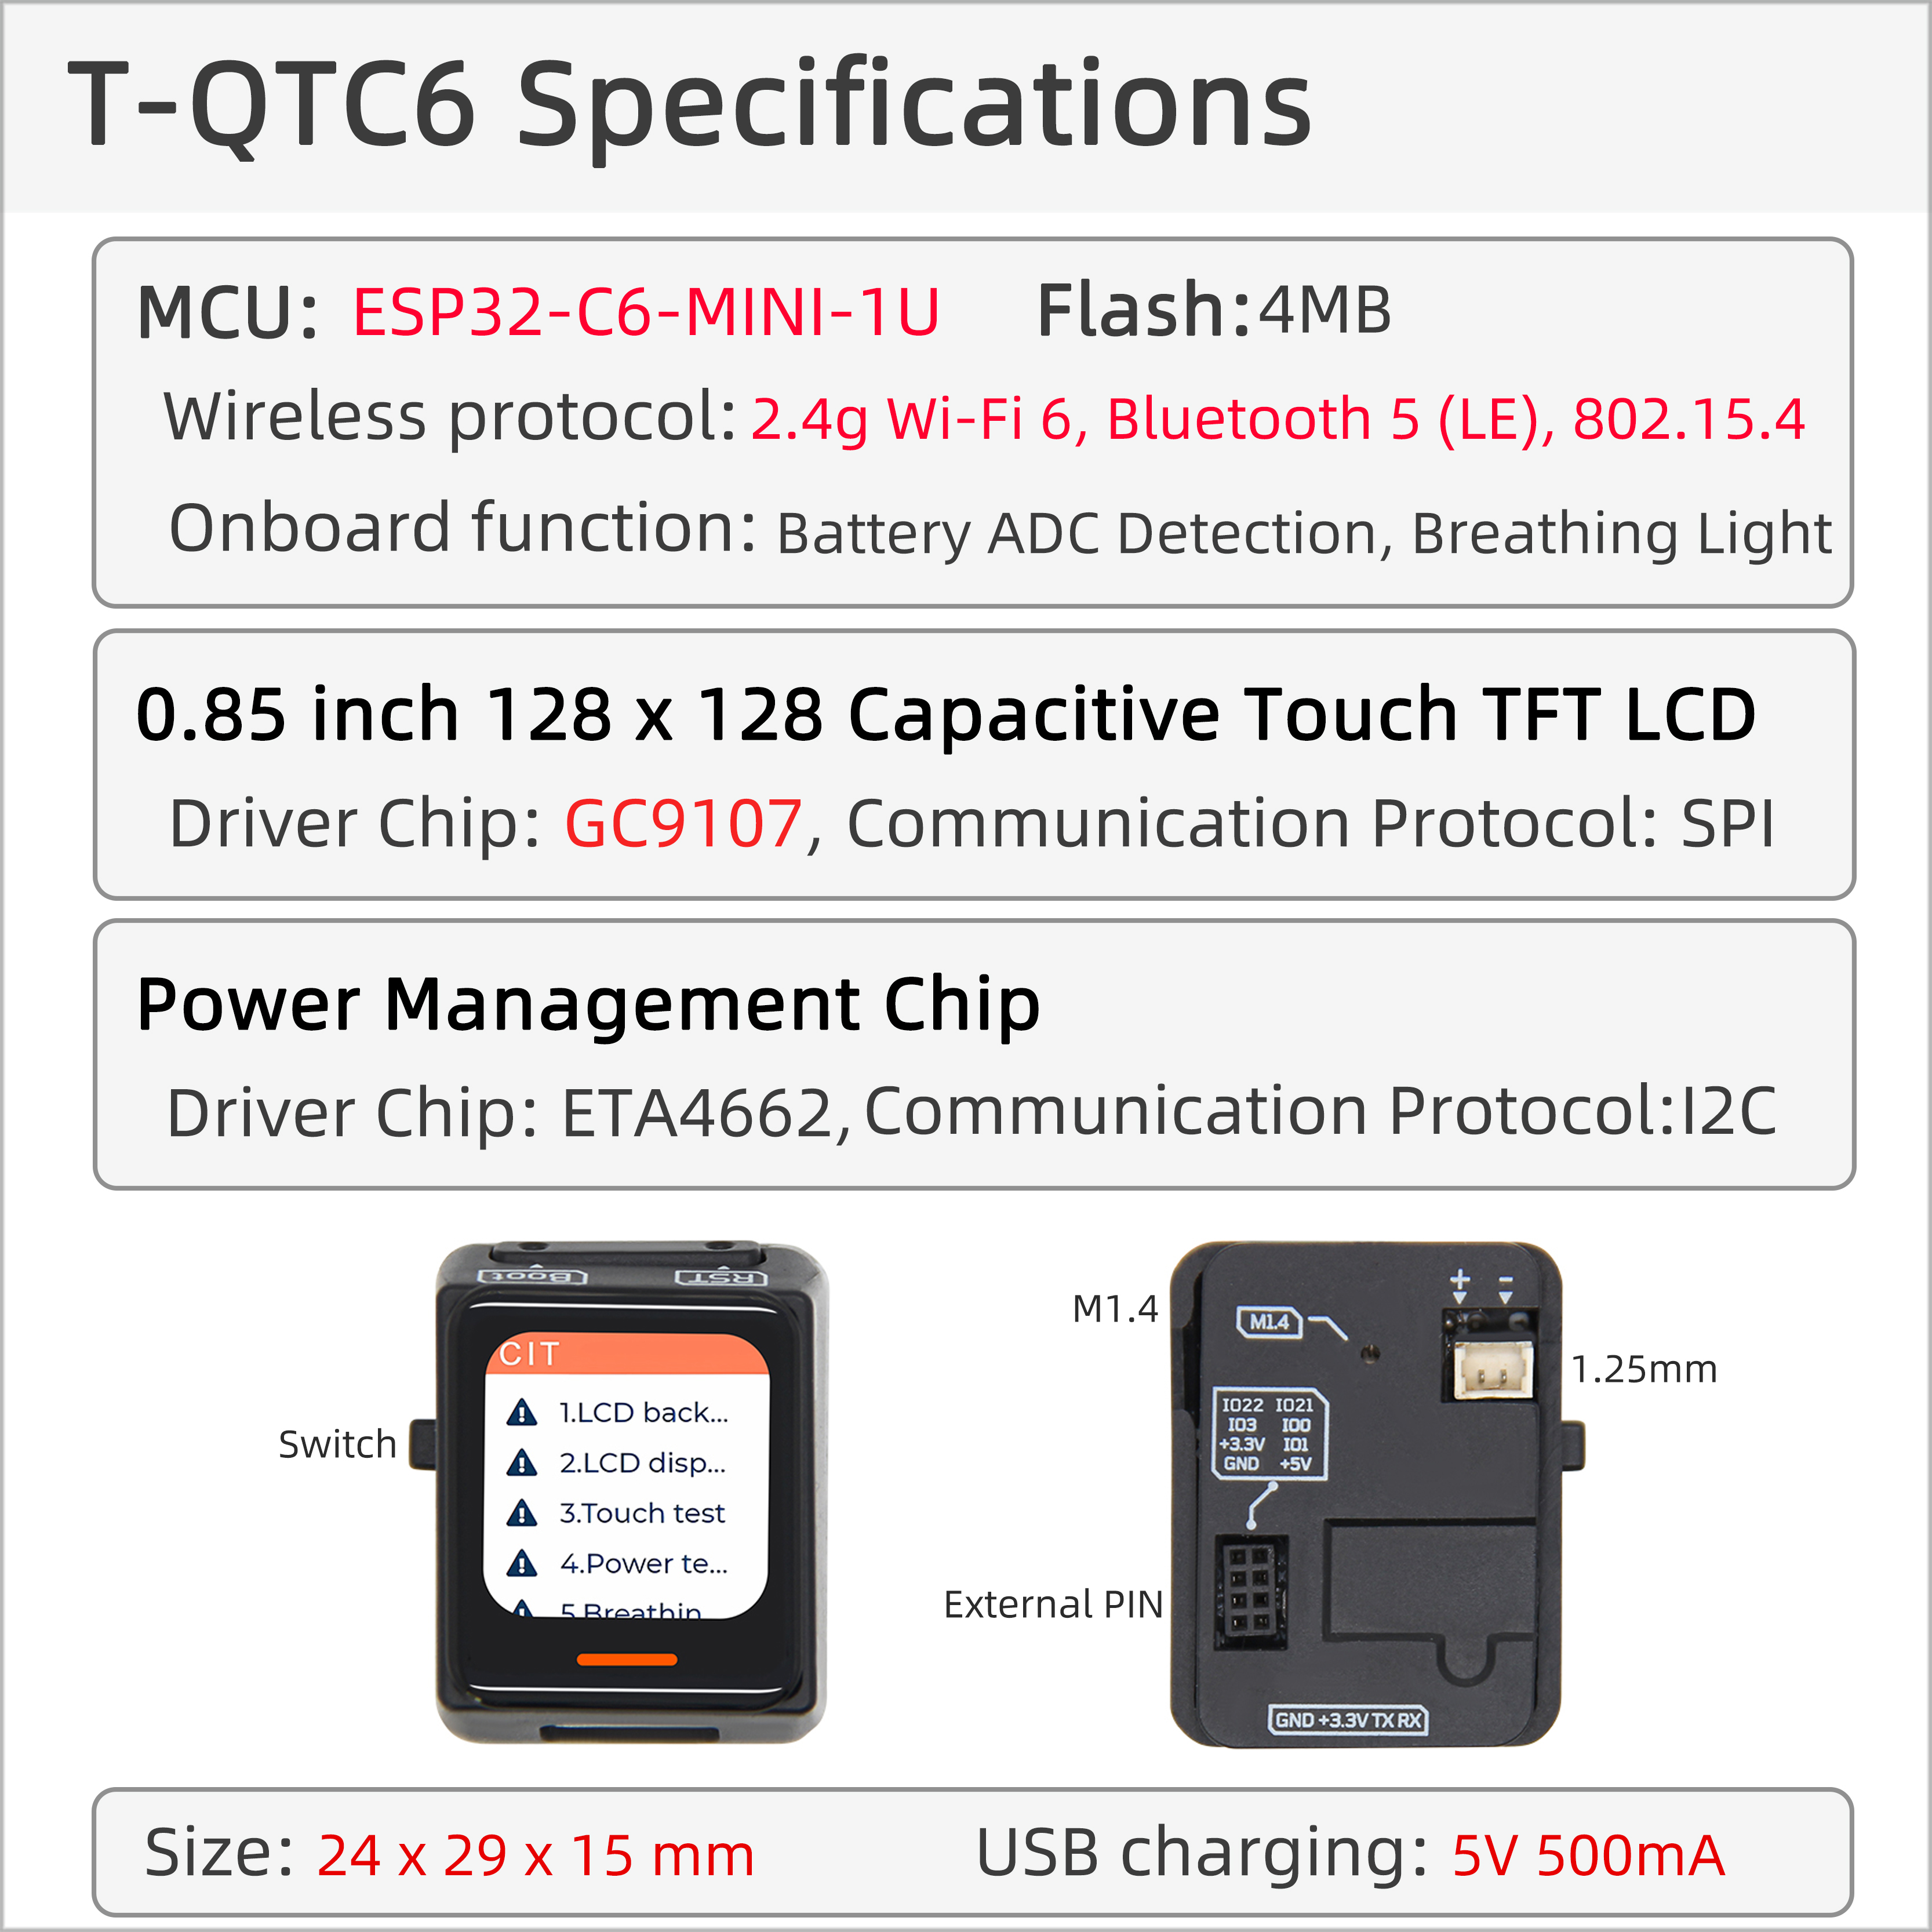
The LILYGO T-QT-C6 is an intelligent wearable development kit based on the ESP32-C6-MINI-1U microcontroller, integrating a 0.85-inch 128×128 resolution TFT LCD display, 6-axis sensor (LSM6DSL, supporting accelerometer and gyroscope functions), and SGM41562 power management unit (PMU). Its core features include: built-in battery power supply, touch interaction, breathing light status indication, 4MB Flash storage, and hardware expansion via QWIIC 4-PIN interface and I2C/SPI pins. Supports Wi-Fi 6/Bluetooth wireless communication, suitable for motion monitoring, embedded development, or portable interactive device scenarios. The product features a compact design, balancing low power consumption with high integration, ideal for developers in IoT, wearable devices, and other fields for prototyping and functional verification.
Preview
Physical Image
Pinout Diagram
Modules
MCU
- Module: ESP32-C6-MINI-1U
- Chip: ESP32-C6-FH4
- PSRAM: 4M
- FLASH: -
- Other Notes: For more information, please visit Espressif Official ESP32-C6-MINI-1U Datasheet
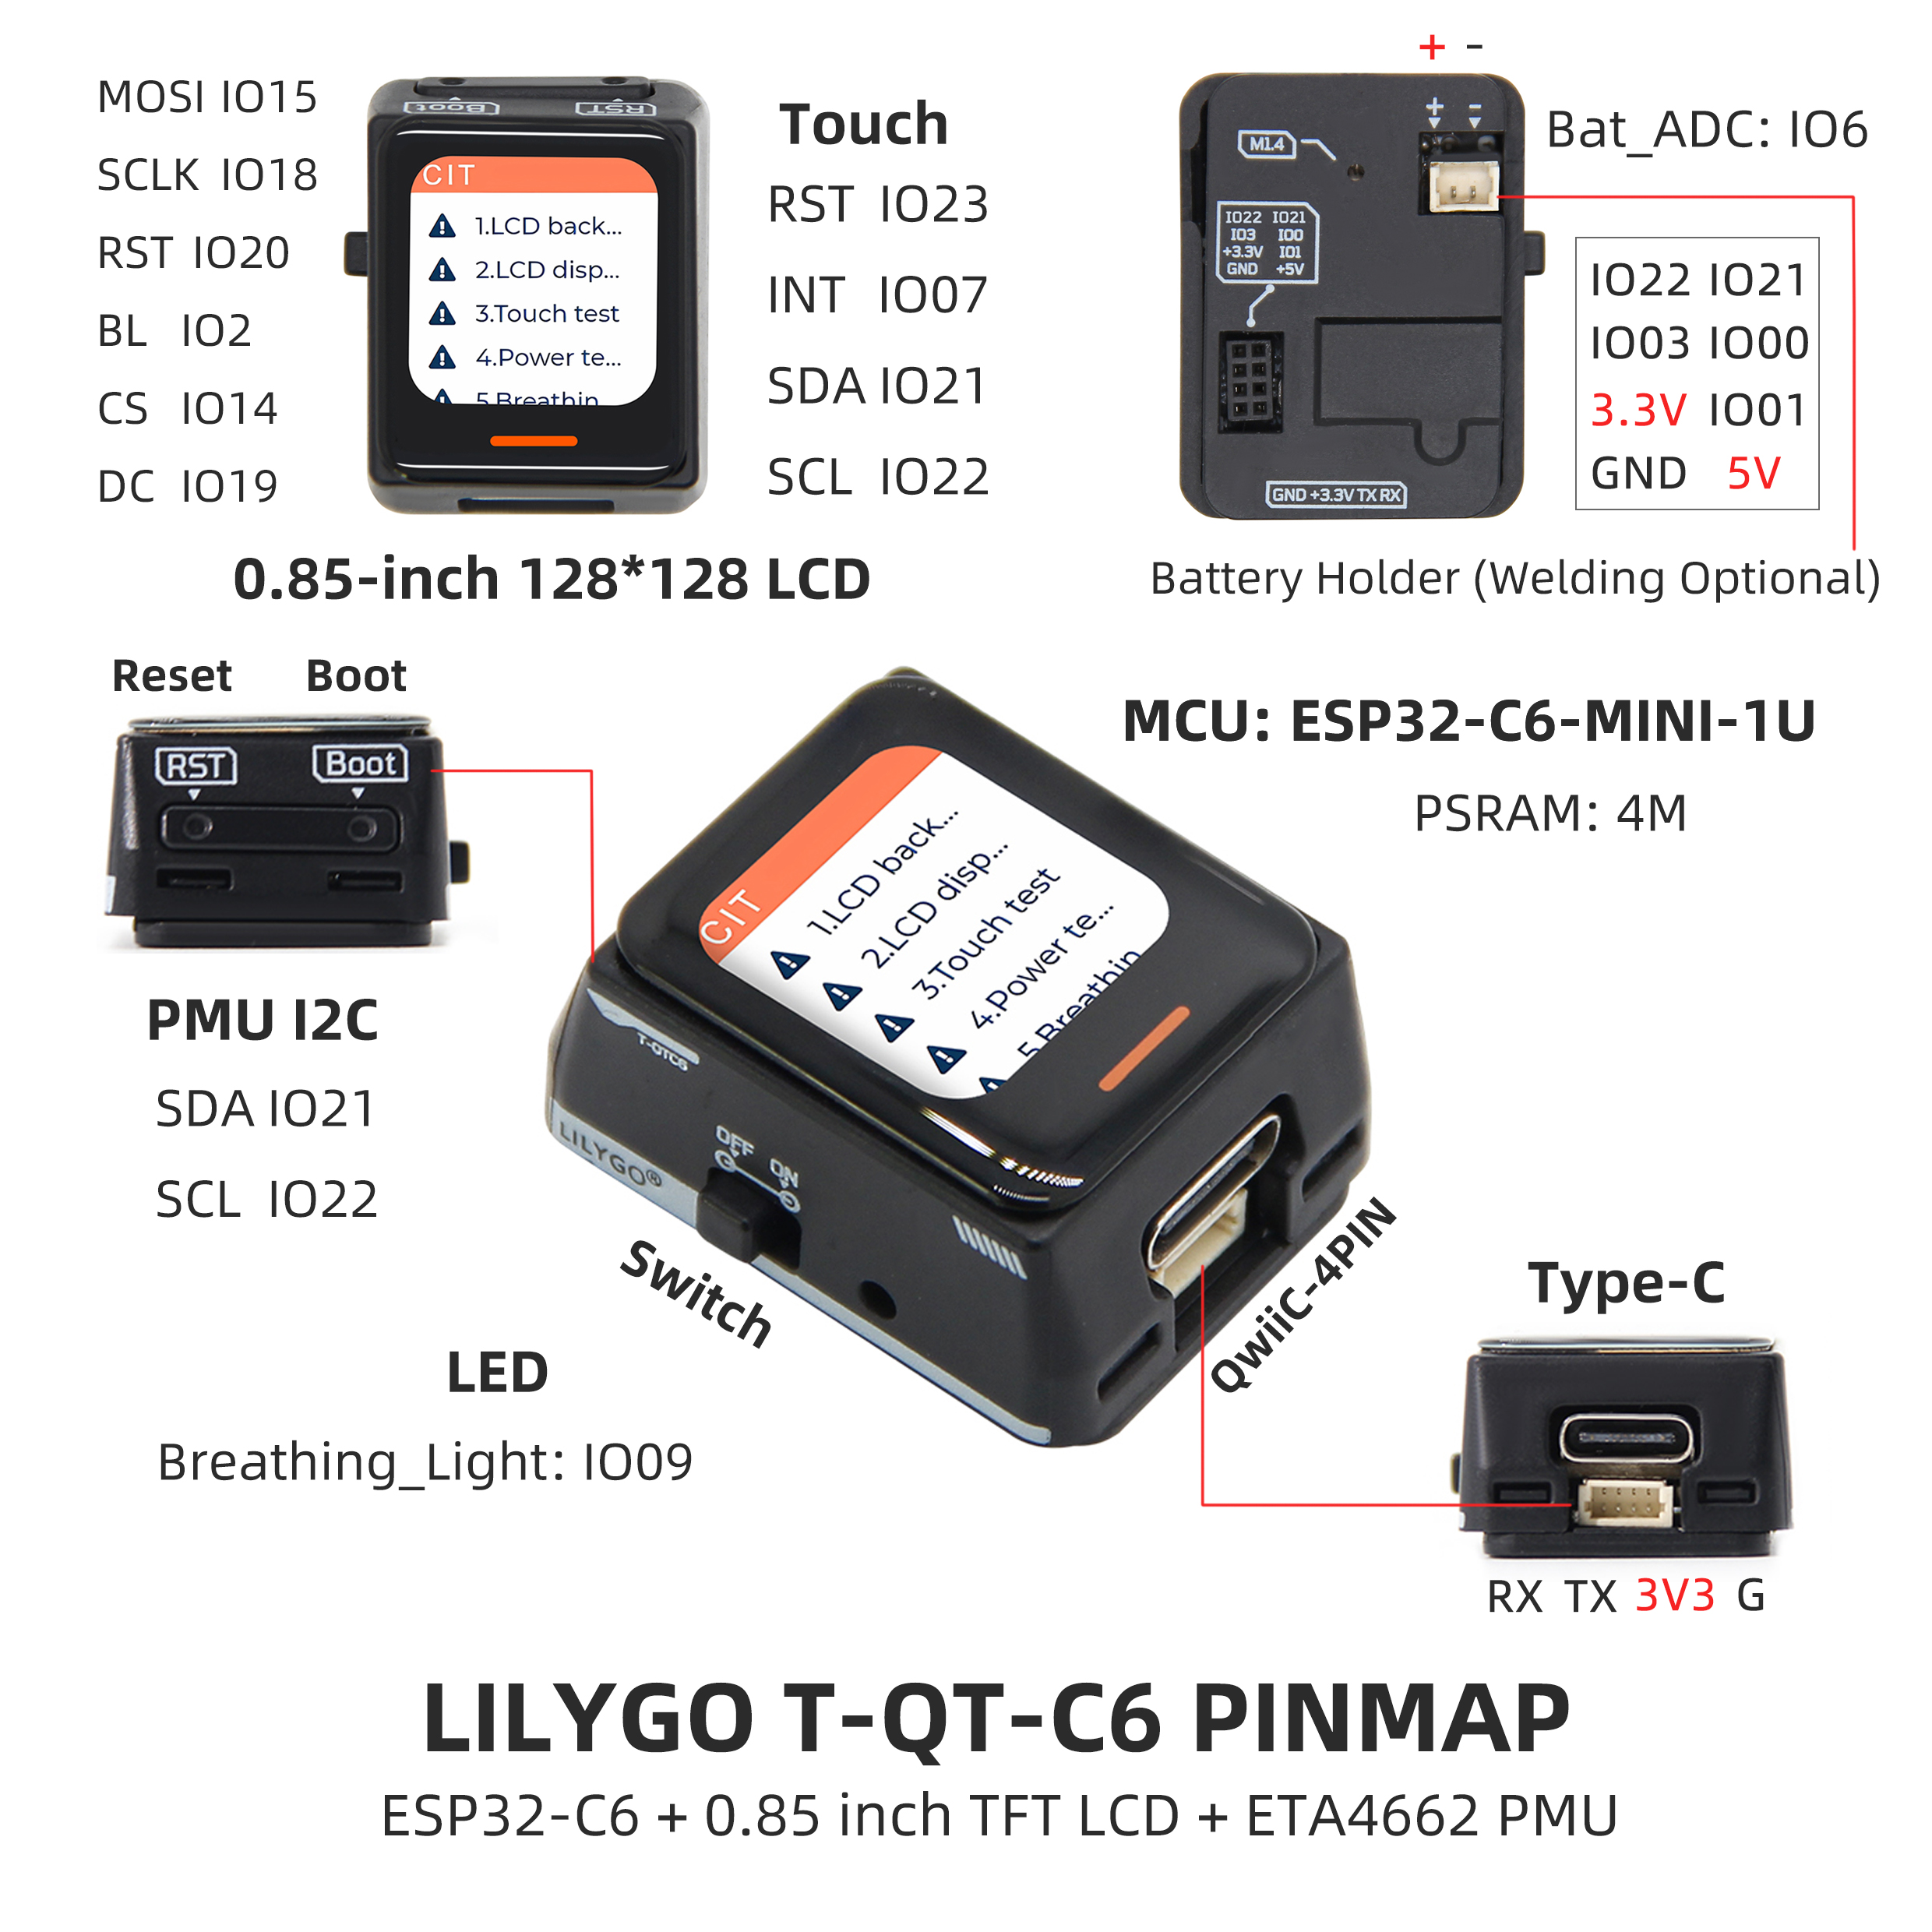
Display
- Screen Model: N085-1212TBWIG06-C08
- Size: 0.85-inch
- Resolution: 128x128px
- Display Type: TFT
- Driver IC: GC9107
- Bus Communication Protocol: Standard SPI
Touch Chip
- Chip: CST816T
- Bus Communication Protocol: I2C
- Other Notes: Supports swipe up, swipe down, swipe left, swipe right, double-click, single-click, long-press gesture triggering, with multiple interrupt trigger modes integrated. Automatically enters sleep power-saving mode after no touch for several seconds by default.
Power Management Chip
T-QT-C6_V1.0-V1.1
- Chip: ETA4662
- Bus Communication Protocol: I2C
- Other Notes: Chip with power path management, automatically recognizes battery power and USB power, automatically switches to USB power when no battery is inserted, and automatically switches to battery power when no USB power is available.
T-QT-C6_V1.2
- Chip: SGM41562
- Bus Communication Protocol: I2C
- Other Notes: Chip with power path management, automatically recognizes battery power and USB power, automatically switches to USB power when no battery is inserted, and automatically switches to battery power when no USB power is available.
Battery Backplane Inertial Sensor
T-QT-C6_V1.1-V1.2
- Chip: LSM6DSLTR
- Bus Communication Protocol: I2C
- Other Notes: 6-axis sensor, supports step counting, posture detection, etc.
Overview
| Component | Description |
|---|---|
| MCU | ESP32-C6-MINI-1U |
| Flash | 4MB |
| PSRAM | 4MB |
| Display | 0.85-inch GC9107 TFT (128×128) |
| Touch | CST816T Capacitive Touch Screen |
| Sensor | LSM6DSLTR 6-axis IMU |
| Power Management | SGM41562 PMU |
| Wireless | Wi-Fi 6 + Bluetooth 5 (LE) |
| USB | 1 × USB Port and OTG (TYPE-C Interface) |
| IO Interface | 2 × 2×7 Expansion IO Interface |
| Expansion Interface | QWIIC 4-pin + Battery Interface + Power Interface |
| LED | WS2812B/C Breathing Light |
| Buttons | 1 x RESET Button + 1 x BOOT Button |
| Dimensions | 33×24×44.5mm |
Quick Start
Example Support
| Example | Support IDE And Version | Description | Picture |
|---|---|---|---|
| Battery_Voltage | [Arduino IDE][arduino-esp32-libs_v3.0.2] |
||
| Breathing_Light | [Arduino IDE][arduino-esp32-libs_v3.0.2] |
||
| ChipScan | [Arduino IDE][arduino-esp32-libs_v3.0.2] |
||
| CST816T | [Arduino IDE][arduino-esp32-libs_v3.0.2] |
||
| Deep_Sleep | [Arduino IDE][arduino-esp32-libs_v3.0.2] |
||
| Light_Sleep | [Arduino IDE][arduino-esp32-libs_v3.0.2] |
||
| ETA4662 | [Arduino IDE][arduino-esp32-libs_v3.0.2] |
||
| GFX | [Arduino IDE][arduino-esp32-libs_v3.0.2] |
||
| IMU | [Arduino IDE][arduino-esp32-libs_v3.0.2] |
||
| IMU_Level | [Arduino IDE][arduino-esp32-libs_v3.0.2] |
||
| SGM41562 | [Arduino IDE][arduino-esp32-libs_v3.0.2] |
||
| Lvgl_CIT_ETA4662 | [Arduino IDE][arduino-esp32-libs_v3.0.2] |
Factory original test file | |
| Lvgl_CIT_SGM41562 | [Arduino IDE][arduino-esp32-libs_v3.0.2] |
Factory original test file | |
| Light_Sleep_Wakeup | [Arduino IDE][arduino-esp32-libs_v3.0.2] |
||
| (More examples please refer to the GitHub repository) |
| Firmware | Description | Picture |
|---|---|---|
| Lvgl_CIT_ETA4662 | Factory original test file | |
| Lvgl_CIT_SGM41562 | Factory original test file |
PlatformIO
Install VisualStudioCode, choose the version for your system.
Open the "Extensions" in the sidebar of Visual Studio Code (or use Ctrl+Shift+X), search for the "PlatformIO IDE" extension and install it.
While the extension is installing, you can go to GitHub to download the program. You can download the main branch code by clicking the green "<> Code" button, or download the "Releases" version from the sidebar.
After the extension is installed, open the sidebar's Explorer (or use Ctrl+Shift+E), click "Open Folder", find the project code you just downloaded (the entire folder), click "Add", and the project files will be added to your workspace.
Open the "platformio.ini" file in the project folder (PlatformIO will automatically open the "platformio.ini" of the corresponding folder after adding it). Under the "[platformio]" section, uncomment to select the example program you want to upload (marked by "default_envs = xxx"). Then click the "[√]" at the bottom left to compile. If the compilation is successful, connect the microcontroller to your computer and click "[→]" at the bottom left to upload.
Arduino
Install Arduino IDE, choose the version for your system.
Open the "example" directory in the project folder, select the example project folder, and open the file ending with ".ino" to open the Arduino IDE project workspace.
Open the "Tools" menu in the top bar -> Select "Board" -> "Boards Manager", find or search for "esp32", and install the board files by "Espressif Systems". Then return to the "Board" menu and select the board type under "ESP32 Arduino". The board type to select is determined by the "board = xxx" header under the [env] section in the "platformio.ini" file. If the corresponding board is not available, you need to manually add the board from the "board" directory in the project folder.
Open the menu bar "File" -> "Preferences", find the "Sketchbook location" field, and copy all the library files along with their folders from the "libraries" folder in the project directory to the "libraries" folder in this location.
Select the correct settings in the "Tools" menu as shown in the table below.
| Setting | Value |
|---|---|
| Board | ESP32C6 Dev Module |
| Upload Speed | 921600 |
| CPU Frequency | 160MHz |
| Flash Mode | QIO |
| Flash Size | 4MB (32Mb) |
| Core Debug Level | None |
| Partition Scheme | Huge APP (3MB No OTA/1MB SPIFFS) |
Select the correct port.
Click the "√" in the top right corner to compile. If the compilation is successful, connect the microcontroller to your computer and click "→" in the top right corner to upload.
Development Platforms
Pin Overview
| Display Pins | ESP32C6 Pins |
|---|---|
| MOSI | IO15 |
| SCLK | IO18 |
| RST | IO20 |
| BL | IO2 |
| CS | IO14 |
| DC | IO19 |
| Battery Related Pins | ESP32C6 Pins |
|---|---|
| BATTERY_MEASUREMENT_CONTROL | IO8 |
| BATTERY_ADC_DATA | IO6 |
| Breathing Light Pins | ESP32C6 Pins |
|---|---|
| BREATHING_LIGHT | IO9 |
| Touch Chip Pins | ESP32C6 Pins |
|---|---|
| RST | IO23 |
| INT | IO7 |
| SDA | IO21 |
| SCL | IO22 |
| Sleep Wake-up Pins | ESP32C6 Pins |
|---|---|
| SLEEP_WAKE_UP_INT | IO7 |
| Power Management Chip Pins | ESP32C6 Pins |
|---|---|
| SDA | IO21 |
| SCL | IO22 |
T-QT-C6_V1.1-V1.2
| Inertial Sensor Pins | ESP32C6 Pins |
|---|---|
| SDA | IO21 |
| SCL | IO22 |
| LSM6DSL_IIC_ADDRESS_MODE | IO3 |
| INT1 | IO0 |
| INT2 | IO1 |
T-QT-C6_V1.2
| Power Management Chip Pins | ESP32C6 Pins |
|---|---|
| INT | IO4 |
(For detailed pin definitions, please refer to the schematic diagram)
Related Tests
| Firmware | Program | Description |
|---|---|---|
| [TQT-C6_V1.0-V1.2][Light_Sleep]_firmware_V1.0.0.bin | Light_Sleep | Power Consumption: 516.81uA |
| [TQT-C6_V1.0-V1.2][Deep_Sleep]_firmware_V1.0.0.bin | Deep_Sleep | Power Consumption: 172.61uA |
| (More examples please refer to the GitHub repository) |
FAQ
Q. What are the main application scenarios for T-QT C6?
A. T-QT C6 is specifically designed for smart wearable devices, suitable for motion monitoring, health tracking, smart rings, portable interactive devices, and other scenarios.Q. How to connect external sensors?
A. You can quickly connect compatible sensor modules via the onboard QWIIC 4-pin interface, or connect other peripherals through the 2×7 expansion IO interface.Q. What are the features of ESP32-C6?
A. ESP32-C6 supports Wi-Fi 6 and Bluetooth 5, offering better wireless performance and power efficiency compared to previous ESP32 series.Q. How to achieve low power operation?
A. Through the SGM41562 power management chip and ESP32-C6's low-power modes, combined with software optimization, long-term battery power supply can be achieved.Q. Which development frameworks are supported?
A. Supports multiple development frameworks including Arduino, PlatformIO, ESP-IDF, and MicroPython, meeting the needs of different developers.
Projects
Resources
- Espressif
- ETA4662_V1.8
- AN-CST816T-v1
- WS2812B-2020
- WS2812C-2020
- SGMICRO-SGM41562XGTR
- lsm6dsl
- lsm6dsl-stmicroelectronics_en