Version Iteration
| Version |
Update date |
Update description |
| T-Mini-E-paper-S3_V1.0 |
2023-11-10 |
Initial hardware version |
| T-Mini-E-paper-S3_V1.2 |
2024-01-15 |
Hardware optimization update |
Purchase Links
| Product |
SOC |
FLASH |
PSRAM |
Link |
| T-Mini E-paper S3 |
ESP32-S3 |
4MB |
2MB |
LILYGO Store |
Table of Contents
Description
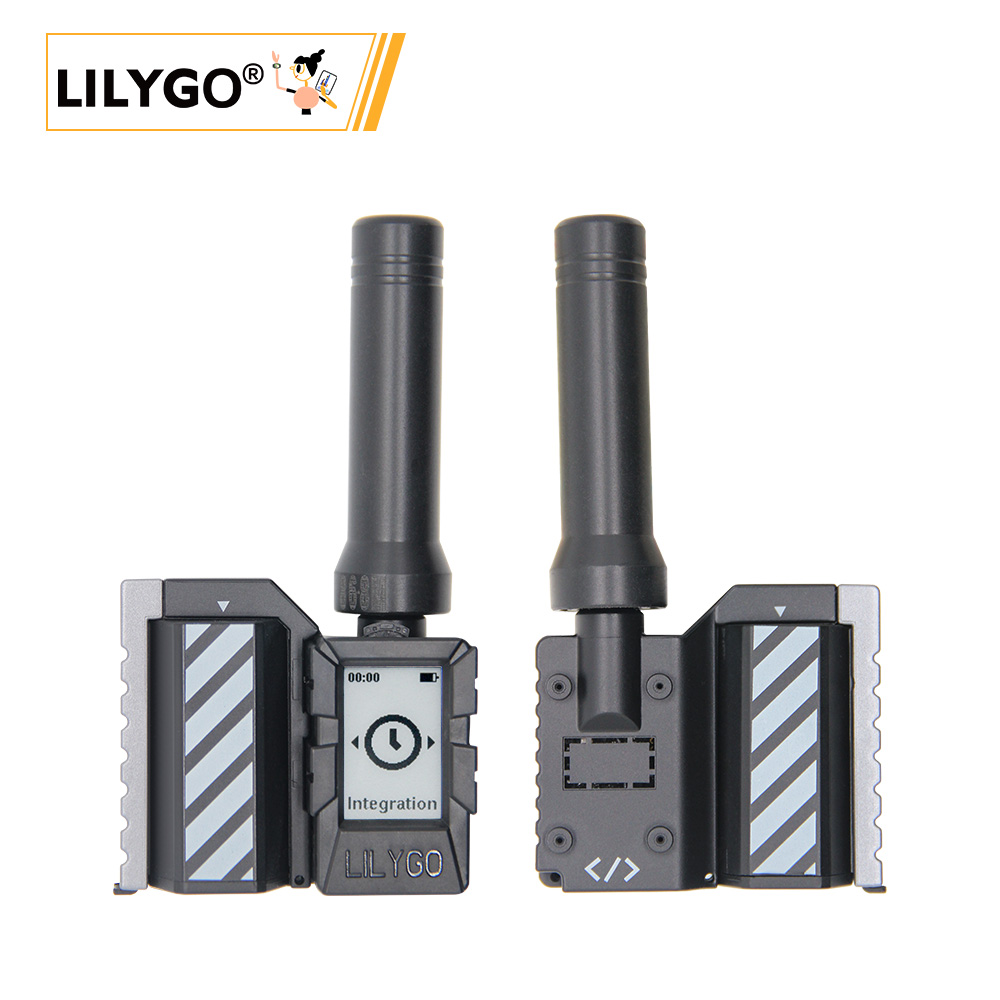
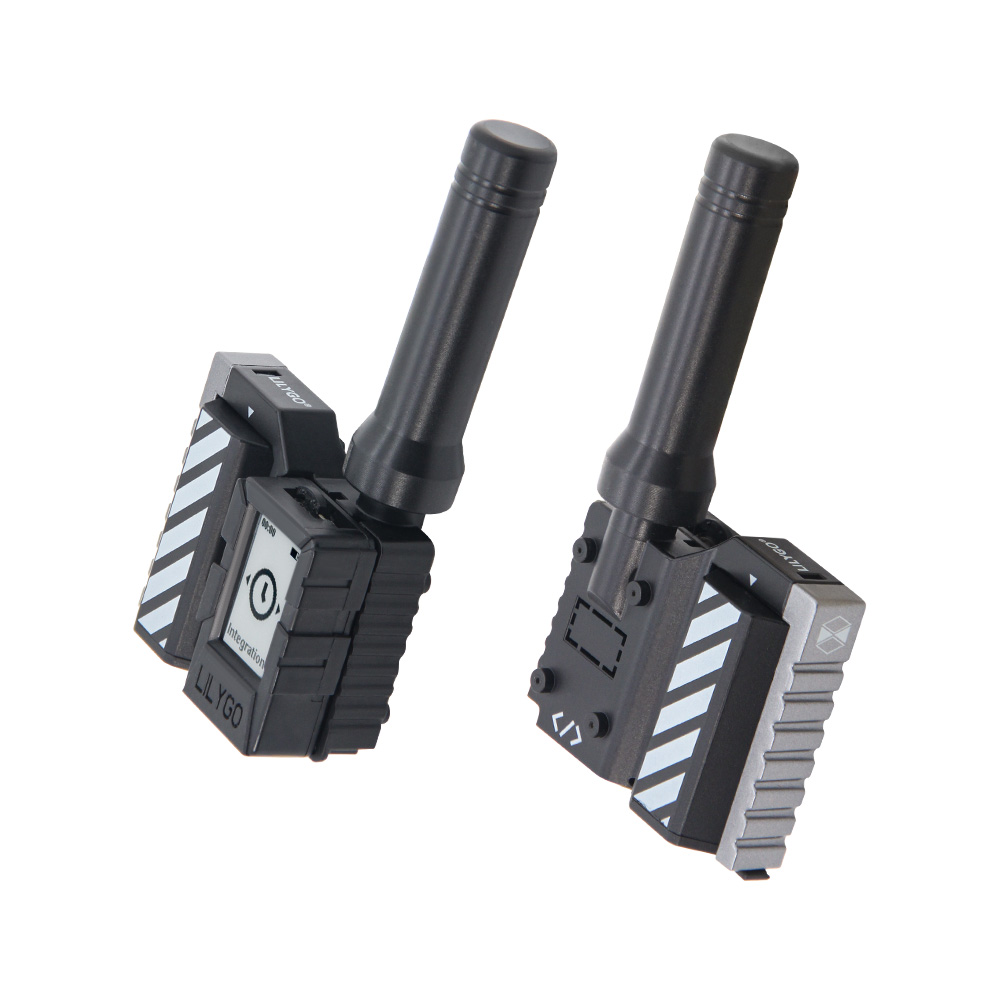
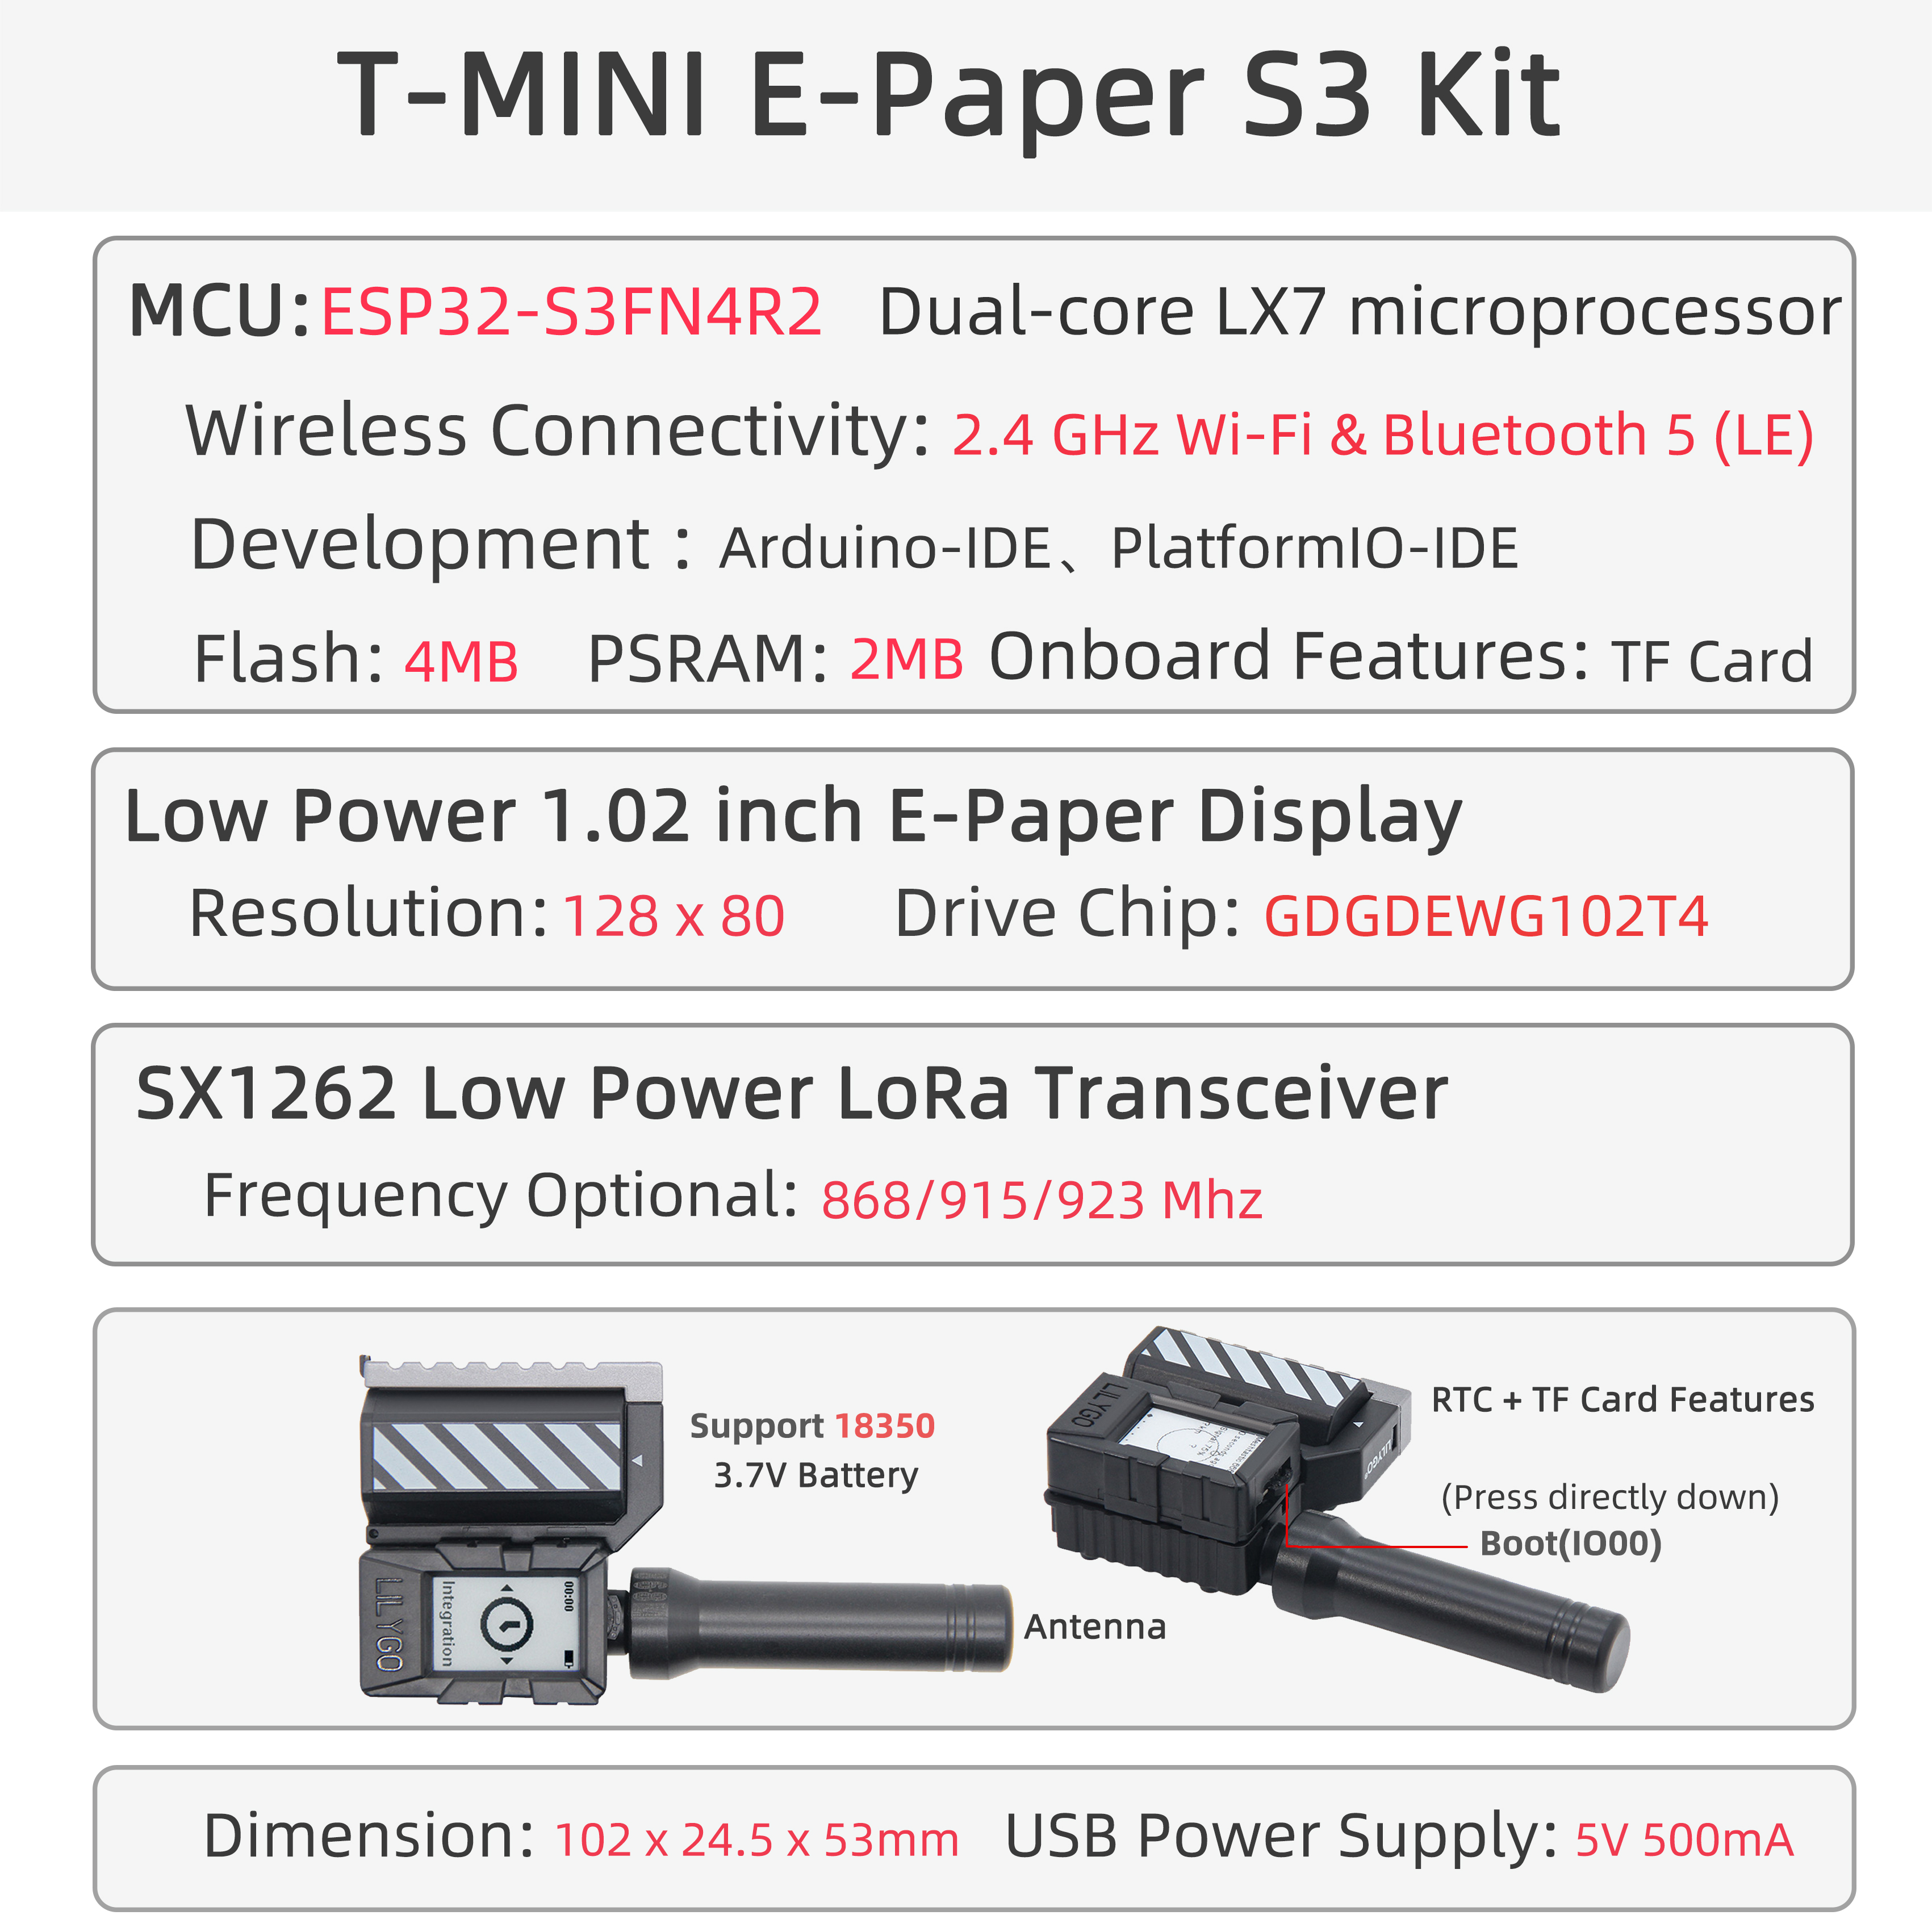
The LILYGO T-MINI E-Paper S3 Kit is a compact (102x24.5x53mm) multifunctional development board featuring the ESP32-S3FN4R2 dual-core processor (with Wi-Fi/Bluetooth 5 support). Its core highlights include an integrated low-power 1.02-inch E-Ink display (128x80 resolution), an SX1262 LoRa long-range communication module supporting 868/915/923MHz bands, and power supply via a 3.7V 18350 lithium battery. Onboard features also include TF card storage expansion, a PCF85063ATL RTC real-time clock, rich GPIO interfaces (SPI/I2C, etc.), and support for deep sleep. It is ideally suited for building IoT application scenarios such as remote environmental monitoring nodes, low-power information display tags, and portable data loggers.
Preview
Physical Image
Pinout Diagram

Modules
MCU
- Chip: ESP32-S3FN4R2
- PSRAM: 2MB (QSPI PSRAM)
- FLASH: 4MB
- Wireless: 2.4 GHz Wi-Fi & Bluetooth 5 (LE)
Display
- Size: 1.02-inch E-Ink display
- Resolution: 128×80px
- Display Type: E-Paper
- Compatible Library: GxEPD
- Bus Communication Protocol: SPI
Wireless Communication
- LoRa: SX1262
- Frequency Bands: 868MHz/915MHz/923MHz (selectable)
Power Management
- RTC: PCF85063ATL Real-Time Clock
- Battery: 18350 3.7V Lithium Battery
Overview
| Component |
Description |
| MCU |
ESP32-S3FN4R2 Dual-core LX7 microprocessor |
| FLASH |
4MB |
| PSRAM |
2MB |
| Display |
1.02-inch E-Paper (128×80) |
| LoRa |
SX1262 (868/915/923MHz) |
| RTC |
PCF85063ATL Real-Time Clock |
| Storage |
TF Card Expansion |
| Wireless |
2.4 GHz Wi-Fi & Bluetooth 5 (LE) |
| USB |
1 × USB Port (TYPE-C Connector) |
| Expansion Interfaces |
1 x LoRa Antenna Interface + 1 x QWIIC Interface |
| Buttons |
1 x RESET Button + 1 x BOOT Button |
| Battery |
18350 3.7V Lithium Battery |
| Mounting Holes |
M1 × 4 |
| Dimensions |
102 × 24.5 × 53 mm |
Quick Start
Example Support
| Example |
Description |
| Extension |
LORA Expansion Module Example, RTC Real-Time Clock Example |
| Meun_Lora_Shield |
Menu Example with Meshtastic functional mode (Built using PlatformIO) |
| Meun |
Menu Interface Mode Example |
| GxEPD_TF_Card_Example |
TF Card Function Example |
| Hello_World_U8G2_Fonts |
U8G2 Font Library Usage Example |
| GxEPD_Example |
E-Ink Display, SD Card, and WiFi Function Test Example |
| Partial_UpdateTest |
E-Ink Display Partial Refresh Function Test Example |
- Install Visual Studio Code and Python
- Search for and install the
PlatformIO extension in the Visual Studio Code extensions marketplace.
- After installation, restart
Visual Studio Code.
- After restarting, select
File -> Open Folder -> Choose the LilyGO-Mini-Epaper-S3 directory.
- Wait for the third-party dependency libraries to finish installing.
- Click to open the
platformio.ini file, under the platformio section.
- Under
default_envs, select the name of the board you want to use and uncomment it.
- Uncomment one line
src_dir = xxxx, ensuring only one line is active.
- Click the (✔) symbol at the bottom left to compile.
- Connect the board to your computer's USB port.
- Click (→) to upload the firmware.
- Click (plug symbol) to monitor the serial output.
- If unable to upload or the USB device keeps blinking, please check the FAQ below.
Arduino
- Using PlatformIO is recommended to avoid cumbersome steps.
- Install Arduino IDE
- Install Arduino ESP32 version 2.0.5 or higher
- Copy all directories from the lib folder to your Arduino libraries folder (e.g., C:\Users\YourUserName\Documents\Arduino\libraries)
- Open Arduino IDE, click
Tools
| Setting |
Value |
| Board |
ESP32S3 Dev Module |
| Upload Speed |
921600 |
| USB Mode |
Hardware CDC and JTAG |
| USB CDC On Boot |
Enabled |
| USB Firmware MSC On Boot |
Disabled |
| USB DFU On Boot |
Disabled |
| CPU Frequency |
240MHz (WiFi) |
| Flash Mode |
QIO 80MHz |
| Flash Size |
4MB (32Mb) |
| Core Debug Level |
None |
| Partition Scheme |
Default 4MB with spiffs (1.5MB APP/1.5MB SPIFFS) |
| PSRAM |
QSPI PSRAM |
| Arduino Runs On |
Core 1 |
| Events Run On |
Core 1 |
- Select
LilyGO-Mini-Epaper-S3 -> Any example
- Select
Port (Note: ESP32S3-Dev-Module requires an external U2T to recognize the port)
- Click
Upload, wait for compilation and upload to complete.
- If unable to upload or the USB device keeps blinking, please check the FAQ below.
- Micropython
- Arduino IDE
- Platform IO
- VS Code
Pin Overview
| GPIO |
LORA |
TF |
EPD(SPI) |
RTC |
BUTTON |
USB |
| IO0 |
|
|
|
|
Button_BOOT |
|
| IO3 |
|
|
|
|
Button_RIGHT |
|
| IO4 |
|
|
|
|
Button_LEFT |
|
| IO5 |
Lora_DIO1 |
|
|
|
|
|
| IO6 |
Lora_MISO |
|
|
|
|
|
| IO8 |
Lora_SCK |
|
|
|
|
|
| IO9 |
|
|
|
RTC_SCL |
|
|
| IO10 |
|
|
EPD_BUSY |
|
|
|
| IO11 |
|
|
EPD_RST |
|
|
|
| IO13 |
|
|
EPD_CS |
|
|
|
| IO14 |
|
|
EPD_SCLK |
|
|
|
| IO15 |
|
|
EPD_MOSI |
|
|
|
| IO16 |
Lora_BUSY |
|
|
|
|
|
| IO17 |
Lora_MOSI |
|
|
|
|
|
| IO18 |
|
|
|
RTC_SDA |
|
|
| IO19 |
|
|
|
|
|
USB_N |
| IO20 |
|
|
|
|
|
USB_P |
| IO21 |
Lora_RST |
|
|
|
|
|
| IO38 |
|
TF_MISO |
|
|
|
|
| IO39 |
|
TF_MOSI |
|
|
|
|
| IO40 |
|
TF_CS |
|
|
|
|
| IO41 |
|
TF_SCK |
|
|
|
|
| IO42 |
|
|
EPD_EN |
|
|
|
Power Consumption
| Firmware |
Program |
Description |
[T-Mini-E-paper-S3_V1.2][Normal_Display]_firmware_V1.0.0.bin |
Normal Display |
Power Consumption: To be supplemented |
[T-Mini-E-paper-S3_V1.2][Deep_Sleep]_firmware_V1.0.0.bin |
Deep Sleep |
Power Consumption: To be supplemented |
FAQ
Mini-E-Paper-S3 uses USB as the JTAG upload port. To print serial information via USB, the USB_CDC_ON_BOOT configuration needs to be enabled.
If the port cannot be found when uploading the program, or if the USB is already used for other functions causing the port not to appear, please manually enter upload mode:
- Connect the board via USB cable
- Press and hold the BOOT button, then press the RST button
- Release the RST button
- Release the BOOT button
- Upload the program
If the above method doesn't work, please flash the firmware file to check if the hardware is functioning properly
Projects
Resources
Dependent Libraries


 English