


 English
LILYGO T-Halow

📦 Project Versions
T-Halow has two different versions, primarily distinguished by their pairing methods. Please select the corresponding documentation based on the hardware version you have:
| Version | Release Date | Documentation Link | Video Tutorial |
|---|---|---|---|
| VER1 | 2023-08-23 | Version 1 Documentation | |
| VER2 | 2024-04-16 | Version 2 Documentation | Watch Video |
Note: Both versions of T-Halow use the same AT Command Set.
Regarding the SDK for the TX-AH module, Taixin does not currently provide detailed API documentation. If you need to compile it yourself, you can refer to this project: hgSDK
🚀 Product Overview
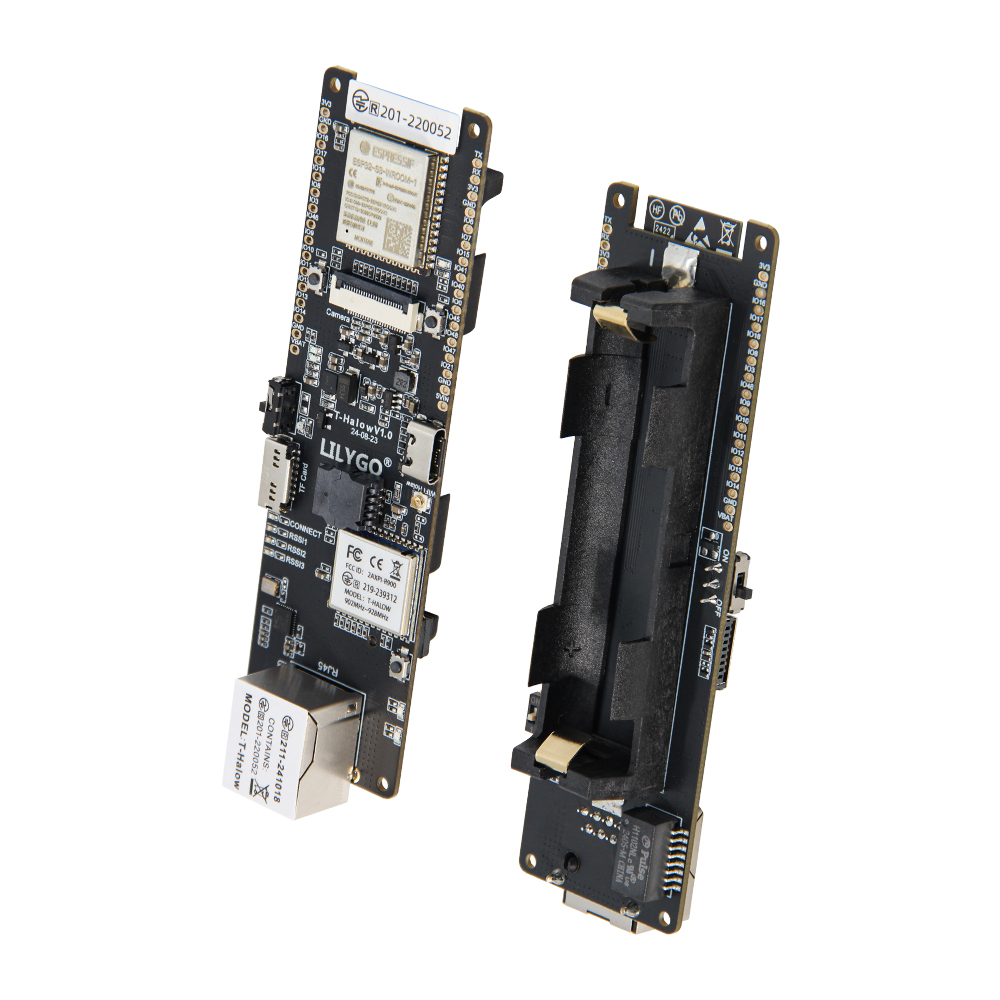
LILYGO T-Halow is a versatile IoT development board integrating ESP32-S3 as the main controller, Wi-Fi HaLow (802.11ah) for long-range communication, a 2MP/5MP camera, and an RJ45 Ethernet port. It is specifically designed for scenarios requiring long-distance, low-power, and highly reliable image transmission and wireless communication, suitable for applications such as security monitoring, remote inspection, and environmental monitoring.
Core Features
- ✅ Dual-Band Long-Range Communication: Supports 2.4GHz Wi-Fi + Bluetooth 5 (LE) and Wi-Fi HaLow (730-928MHz)
- ✅ High-Definition Camera Capability: Supports OV2640 / OV5640 cameras, up to 5 megapixels
- ✅ Wired Network Backup: Built-in RJ45 Ethernet port, supports enabling network functions with replaceable firmware
- ✅ Large Capacity Storage: 16MB Flash + 8MB PSRAM, supports TF card expansion
- ✅ Outdoor Power Solution: Supports 18650 battery power supply, integrated battery ADC monitoring
📊 Hardware Specifications
| Item | Parameter |
|---|---|
| Main Controller Chip | ESP32-S3 (Dual-core, 240MHz) |
| Flash Storage | 16MB |
| PSRAM | 8MB |
| Camera Interface | Supports OV2640 (2MP) / OV5640 (5MP) |
| Wireless Protocol | 2.4GHz Wi-Fi + Bluetooth 5 (LE) |
| Wi-Fi HaLow Frequency Band | Mode 1: 902–928MHz (915M Saw) Mode 2: 859–894MHz (875M Saw) |
| Wired Network | RJ45 Ethernet port (requires flashing corresponding firmware) |
| Power Supply | USB-C (5V/500mA) / 18650 Lithium Battery |
| Battery Monitoring | ADC pin (I003) |
| Programming Platform | Arduino IDE, VS Code, ESP-IDF |
| Dimensions | 113mm × 33mm |
Pinout Diagram (PINMAP)
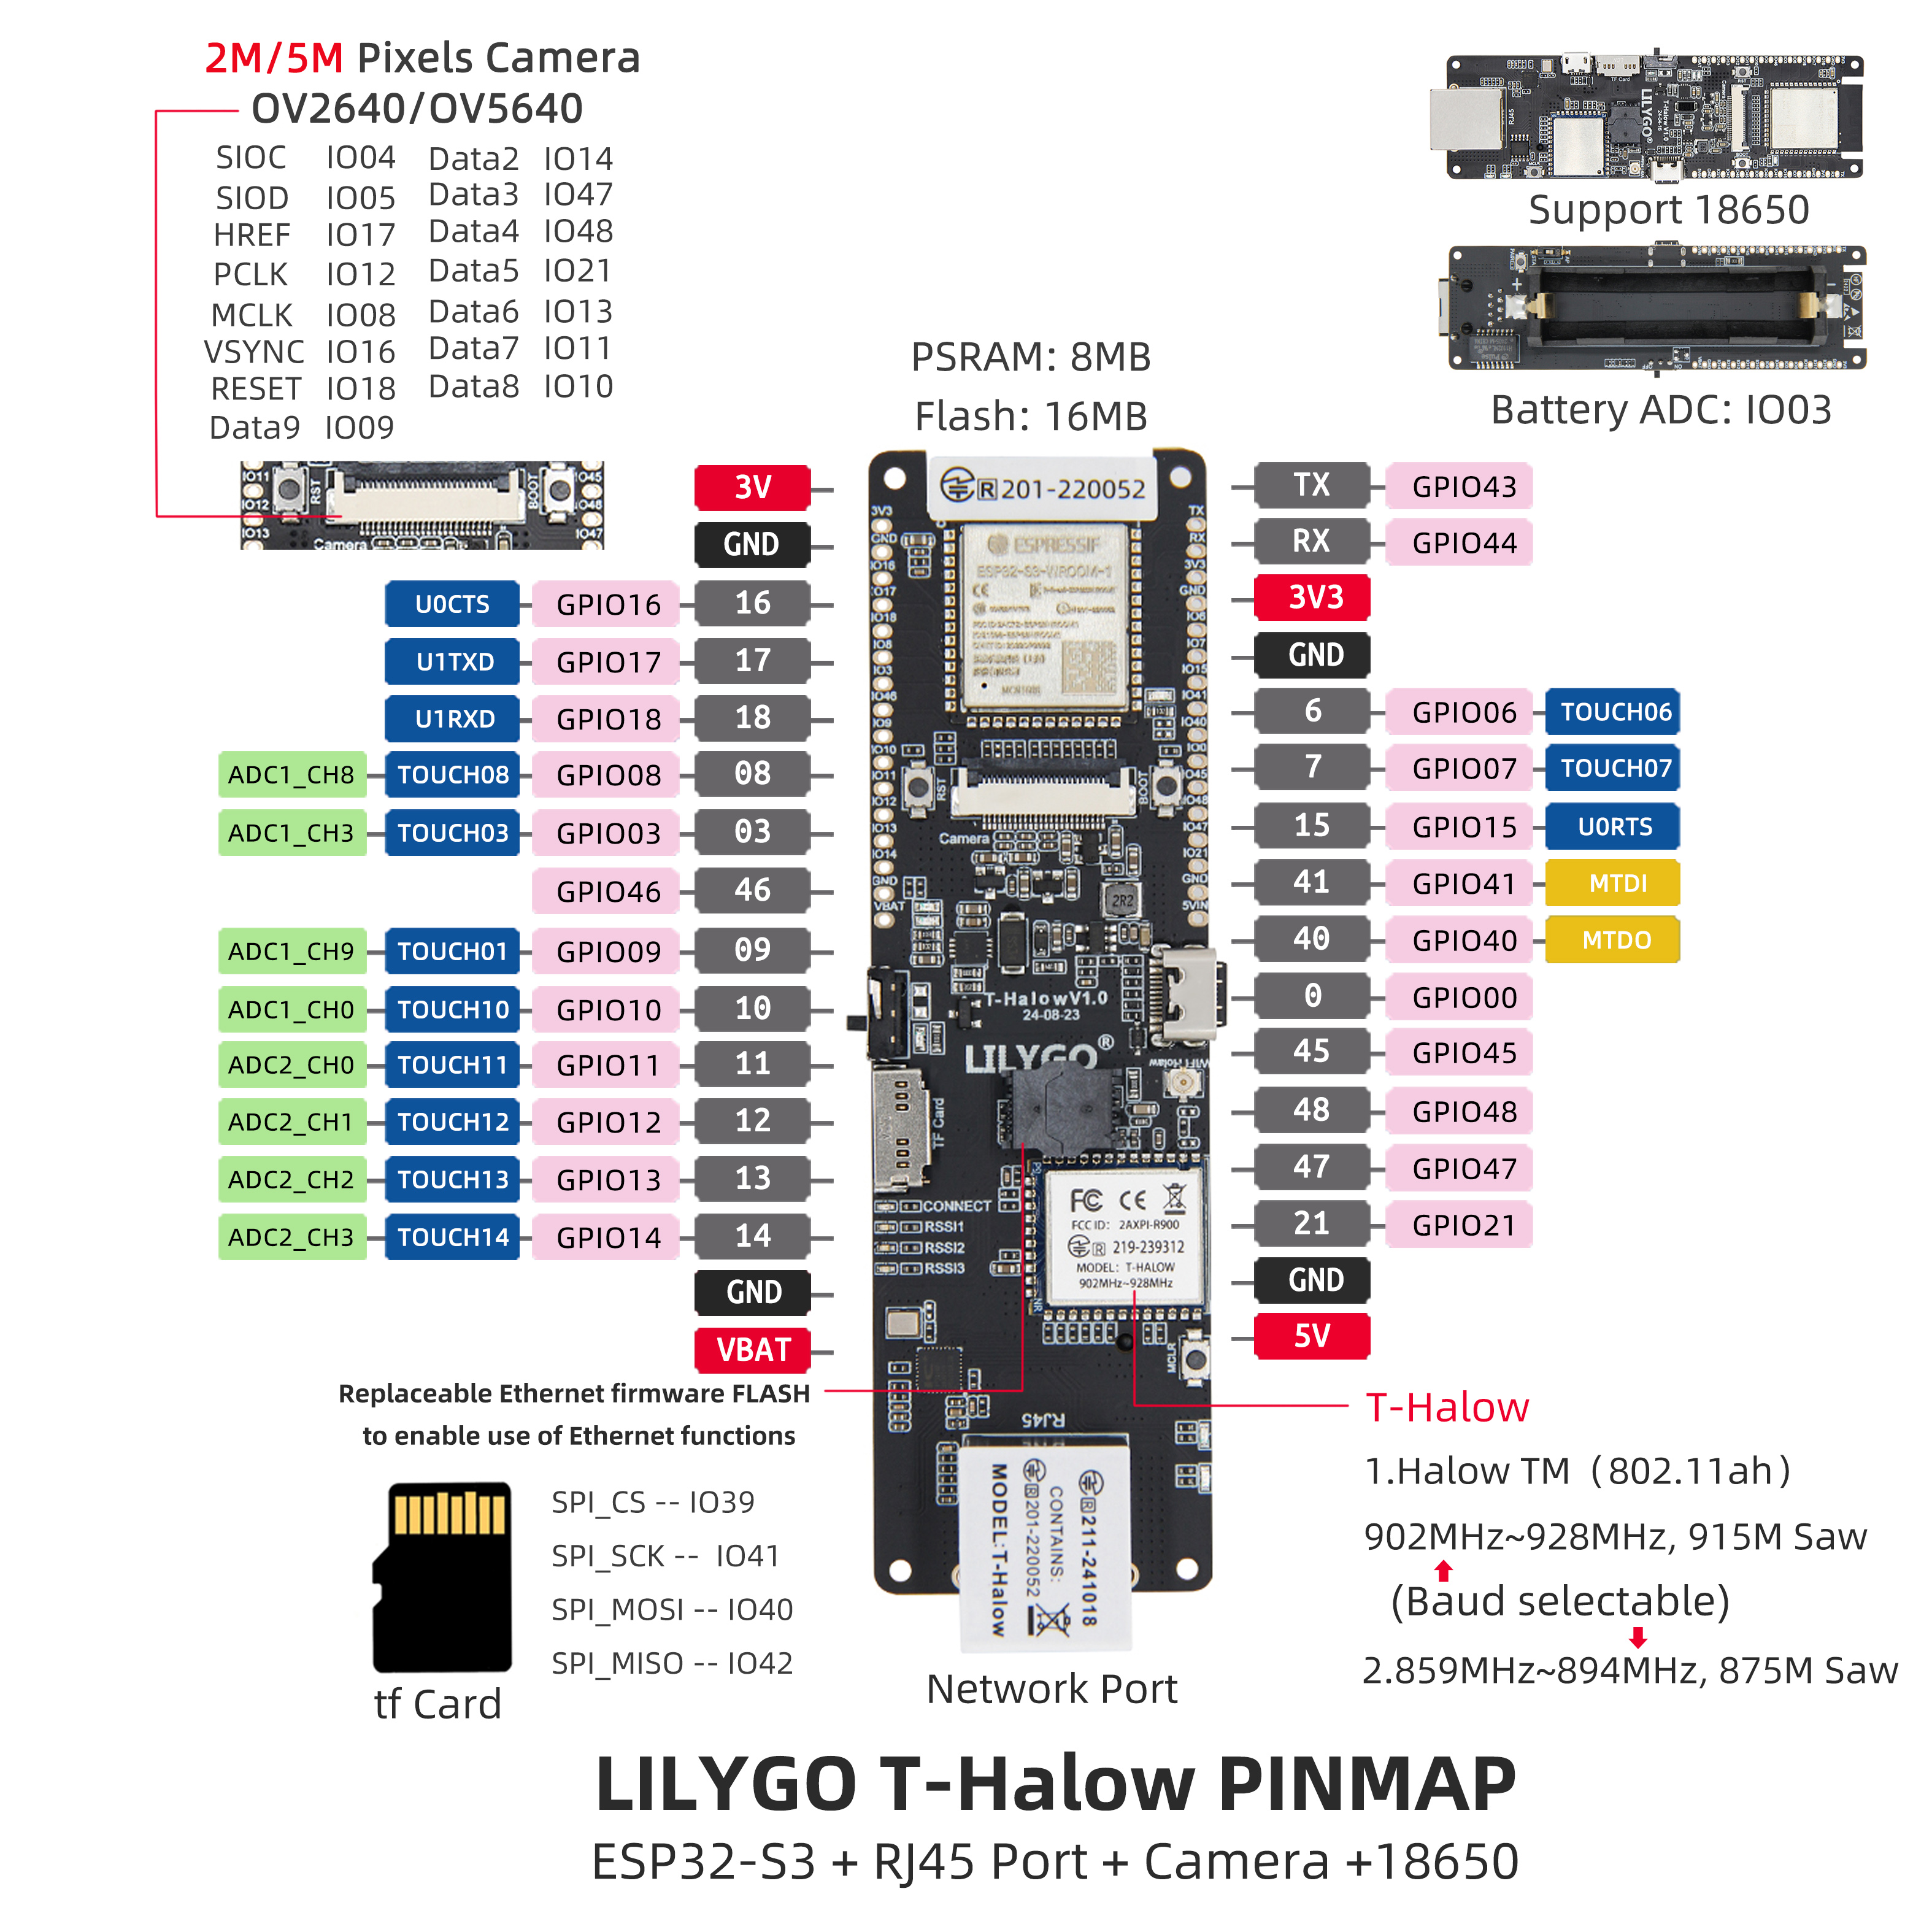
Camera Pin Mapping Table:
| Camera Signal | GPIO Pin |
|---|---|
| SIOC | I004 |
| SIOD | I005 |
| HREF | I017 |
| PCLK | I012 |
| MCLK | I008 |
| VSYNC | I016 |
| RESET | I018 |
| Data0–Data9 | I009–I021, I047–I048 |
SPI Pins (for Ethernet or Peripherals):
- SPI_CS: I039
- SPI_SCK: I041
- SPI_MOSI: I040
- SPI_MISO: I042
📡 Wi-Fi HaLow Introduction
Wi-Fi HaLow (802.11ah) is a long-range, low-power Wi-Fi standard optimized for IoT. With the same transmit power, it offers longer transmission distances and better wall penetration capabilities compared to traditional 2.4GHz/5GHz Wi-Fi.
T-Halow is equipped with Taixin's TX-AH module, supporting:
- Operating Frequency Band: 730–950MHz
- Channel Bandwidth: Adjustable 1/2/4/8MHz
- Physical Throughput: 150Kbps – 32.5Mbps
- Transmission Distance: Up to several kilometers (depending on environment)
🔄 Firmware Download
To download TX-AH firmware, you can use the following two methods:
| Download Method | Documentation |
|---|---|
| Download firmware via downloader | View Documentation |
| Download firmware via ESP32 flash_download_tool | View Documentation |
📚 Official Documentation (English)
For more information about the TX-AH module, please visit Taixin's official website: Resources Download
| Document Name | Link |
|---|---|
| Frequency Setting Instructions | Download |
| TX-AH-Rx00P Series Module Technical Specification | Download |
| TX-AH-Rx00P Bridge Instructions | Download |
| AH Module AT Command Development Guide | Download |
| AH Module Development Board Instructions | Download |
| AH Module Hardware Design Guide | Download |
| AH Performance Test Method | Download |
| AH-RF EMC Certification Guide | Download |
📊 TX-AH Model Comparison
| Module Name | Front Silkscreen Distinction | Certification Status | Supported Frequency Band | Remarks |
|---|---|---|---|---|
| TX-AH-R900P | Lower left corner P9, lower right corner P9 | Can pass FCC/CE certification | 860MHz ~ 928MHz | Standard version |
| TX-AH-R900PNR | Lower left corner P9, lower right corner NR | Can pass FCC certification | 902MHz ~ 928MHz | With 915M Saw, improved reception performance |
| TX-AH-R900PNR-860M | Lower left corner 86, lower right corner NR | Can pass CE certification | 859MHz ~ 894MHz | With 875M Saw, improved reception performance |
Remarks:
- Differences between the P series modules and the earlier A series modules:
- (1) P series lower left silkscreen starts with P, A series starts with R
- (2) P series PIN4/5 require power supply, A series does not
- Modules default without shield; versions with shield have -S suffix added to the module name (S stands for Shield)
🚀 Quick Start
🟢 It is recommended to use PlatformIO, as these examples were developed on PlatformIO. 🟢
PlatformIO Development Environment
- Install Visual Studio Code and Python. Clone or download this project.
- Search for and install the
PlatformIOextension in VSCode extensions. - Restart VSCode after installation.
- Open this project. PlatformIO will automatically download required third-party libraries and dependencies. The first-time process may take a while; please be patient.
- After all dependencies are installed, open the
platformio.iniconfiguration file, uncomment the example program inexample, then pressCtrl+Sto save. - Click the ☑️ at the bottom of VSCode to compile the project, insert the USB cable, and select the COM port in VSCode.
- Finally, click the ➡️ button to upload the program to Flash.
Arduino IDE Development Environment
Install Arduino IDE
Copy and paste all files from
T-Halow/lib/into the Arduino library path (typicallyC:\Users\Username\Documents\Arduino\libraries).Open Arduino IDE, click
File -> Openin the top left, and open the example underT-Halow/example/xxx/xxx.ino.Configure Arduino as follows. Once done, you can click the button in the top left of Arduino to compile and upload:
| Arduino IDE Setting | Value |
|---|---|
| Board | ESP32S3 Dev Module |
| Port | Your port |
| USB CDC On Boot | Enable |
| CPU Frequency | 240MHZ(WiFi) |
| Core Debug Level | None |
| USB DFU On Boot | Disable |
| Erase All Flash Before Sketch Upload | Disable |
| Events Run On | Core1 |
| Flash Mode | QIO 80MHZ |
| Flash Size | 16MB(128Mb) |
| Arduino Runs On | Core1 |
| USB Firmware MSC On Boot | Disable |
| Partition Scheme | 16M Flash(3M APP/9.9MB FATFS) |
| PSRAM | OPI PSRAM |
| Upload Mode | UART0/Hardware CDC |
| Upload Speed | 921600 |
| USB Mode | CDC and JTAG |
🧭 Application Scenarios
- 🏙️ Remote Security Monitoring: Utilize HaLow for long-distance camera footage transmission
- 🌾 Agricultural Environmental Monitoring: Large-scale farmland sensor data collection
- 🏗️ Construction Site Inspection: Long-distance video inspection and equipment status monitoring
- 🔬 Scientific Field Data Collection: Reliable long-distance data transmission
- 📡 IoT Gateway: Connect numerous low-power sensor nodes
⚠️ Important Notes
❗ For more TX-AH module resources, please refer to Taixin's official website: Resources Download Address