


 English
LILYGO T-Display K230
Version History:
| Version | Update Date | Update Description |
|---|---|---|
| T-Display-K230_V1.0 | 2024-01-01 | Initial Version |
Purchase Link
| Product | SOC | Memory | Storage | Link |
|---|---|---|---|---|
| T-Display K230 | K230 + ESP32-S3 | 8Gb LPDDR4 | 16MB FLASH + TF Card | LILYGO Mall |
Table of Contents
Description
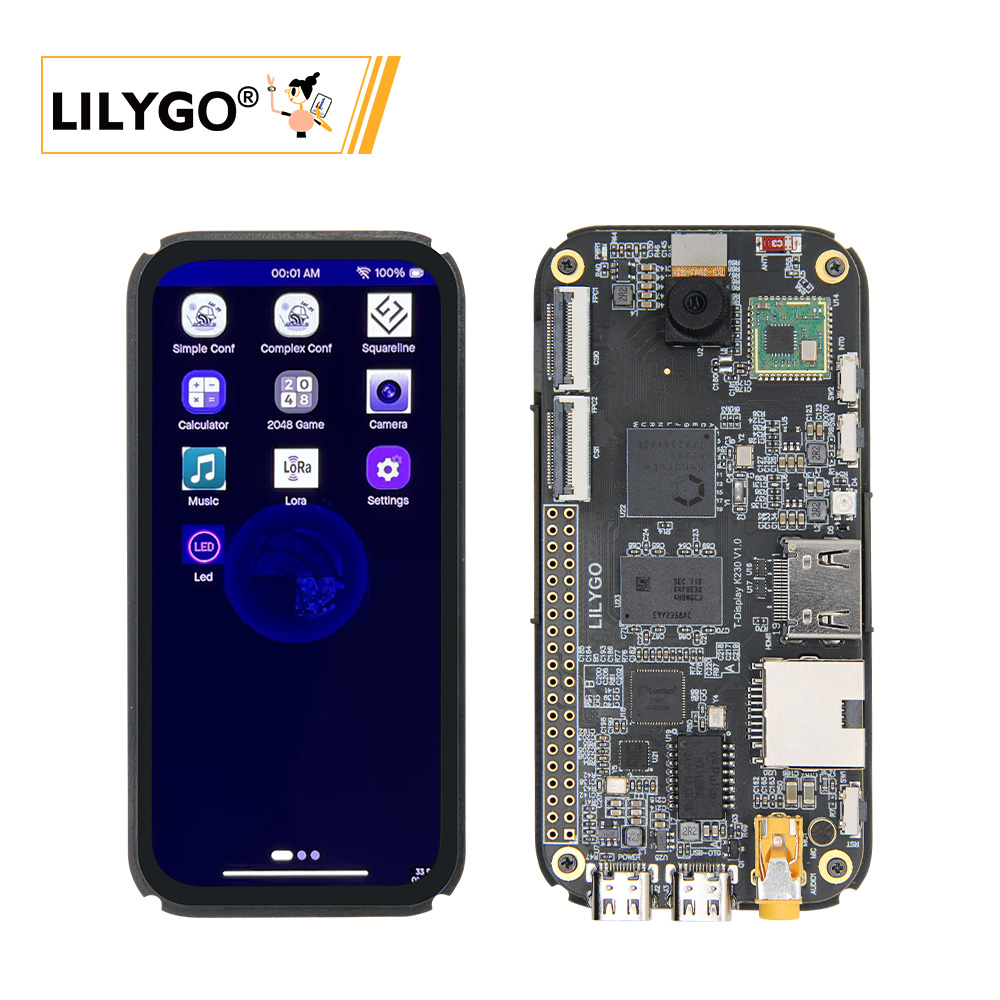
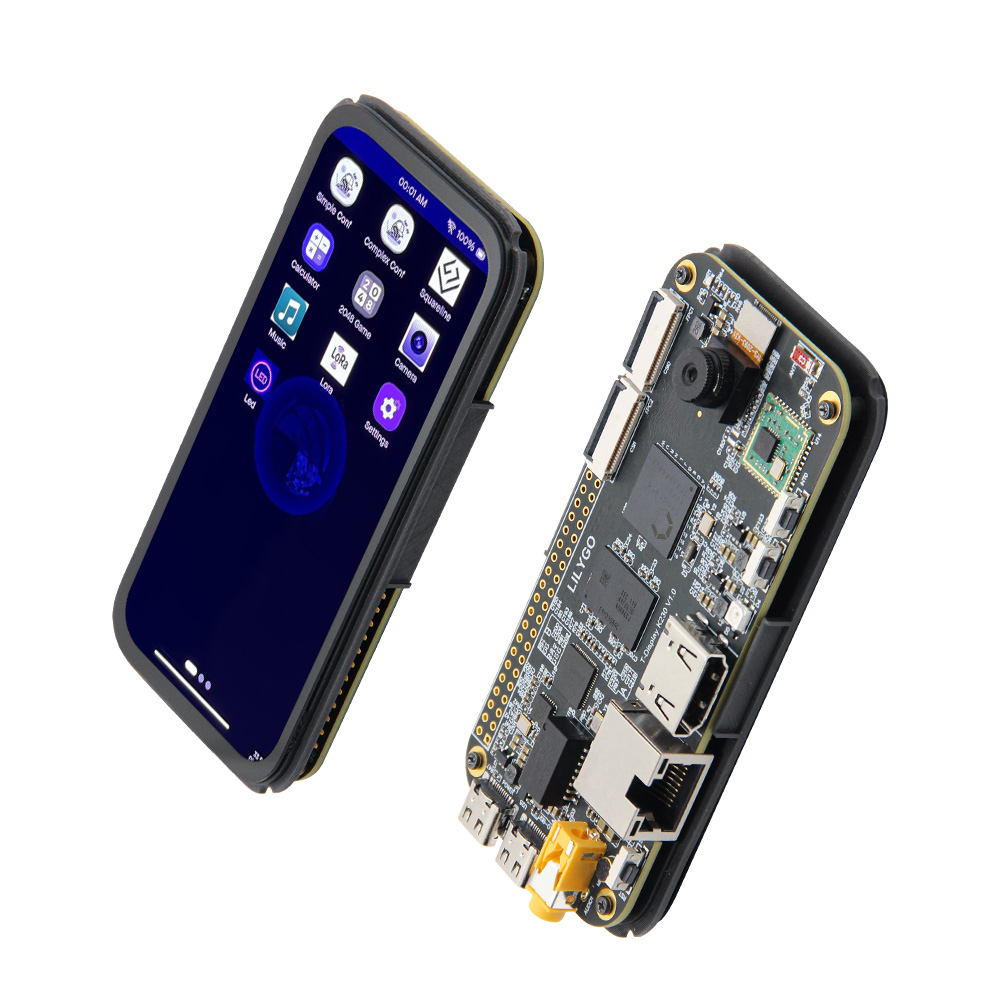
T-Display K230 is a new product based on Canaan Technology's latest K230 chip, following the K210. It inherits the powerful computing capability of K230 with up to 1.6GHz frequency, integrates LILYGO's signature LoRa communication and display features, and includes HDMI and Ethernet interfaces, providing developers with broader application possibilities.
In terms of design, T-Display K230 adopts a handheld device size design, equipped with a 4.1-inch high-quality AMOLED screen supporting capacitive touch, offering a smoother visual and interactive experience. As a high-performance chip in the AIoT field, K230 features rich computing capabilities and expansion interfaces, with dual-core RISC-V processors reaching up to 1.6GHz frequency, integrated NPU computing power close to 1.6TOPS, supporting AI inference acceleration. The combination of LoRa communication + ISP camera gives T-Display K230 strong advantages in remote wireless data transmission, AI recognition, IoT monitoring interaction, and other fields.
Preview
Physical Images
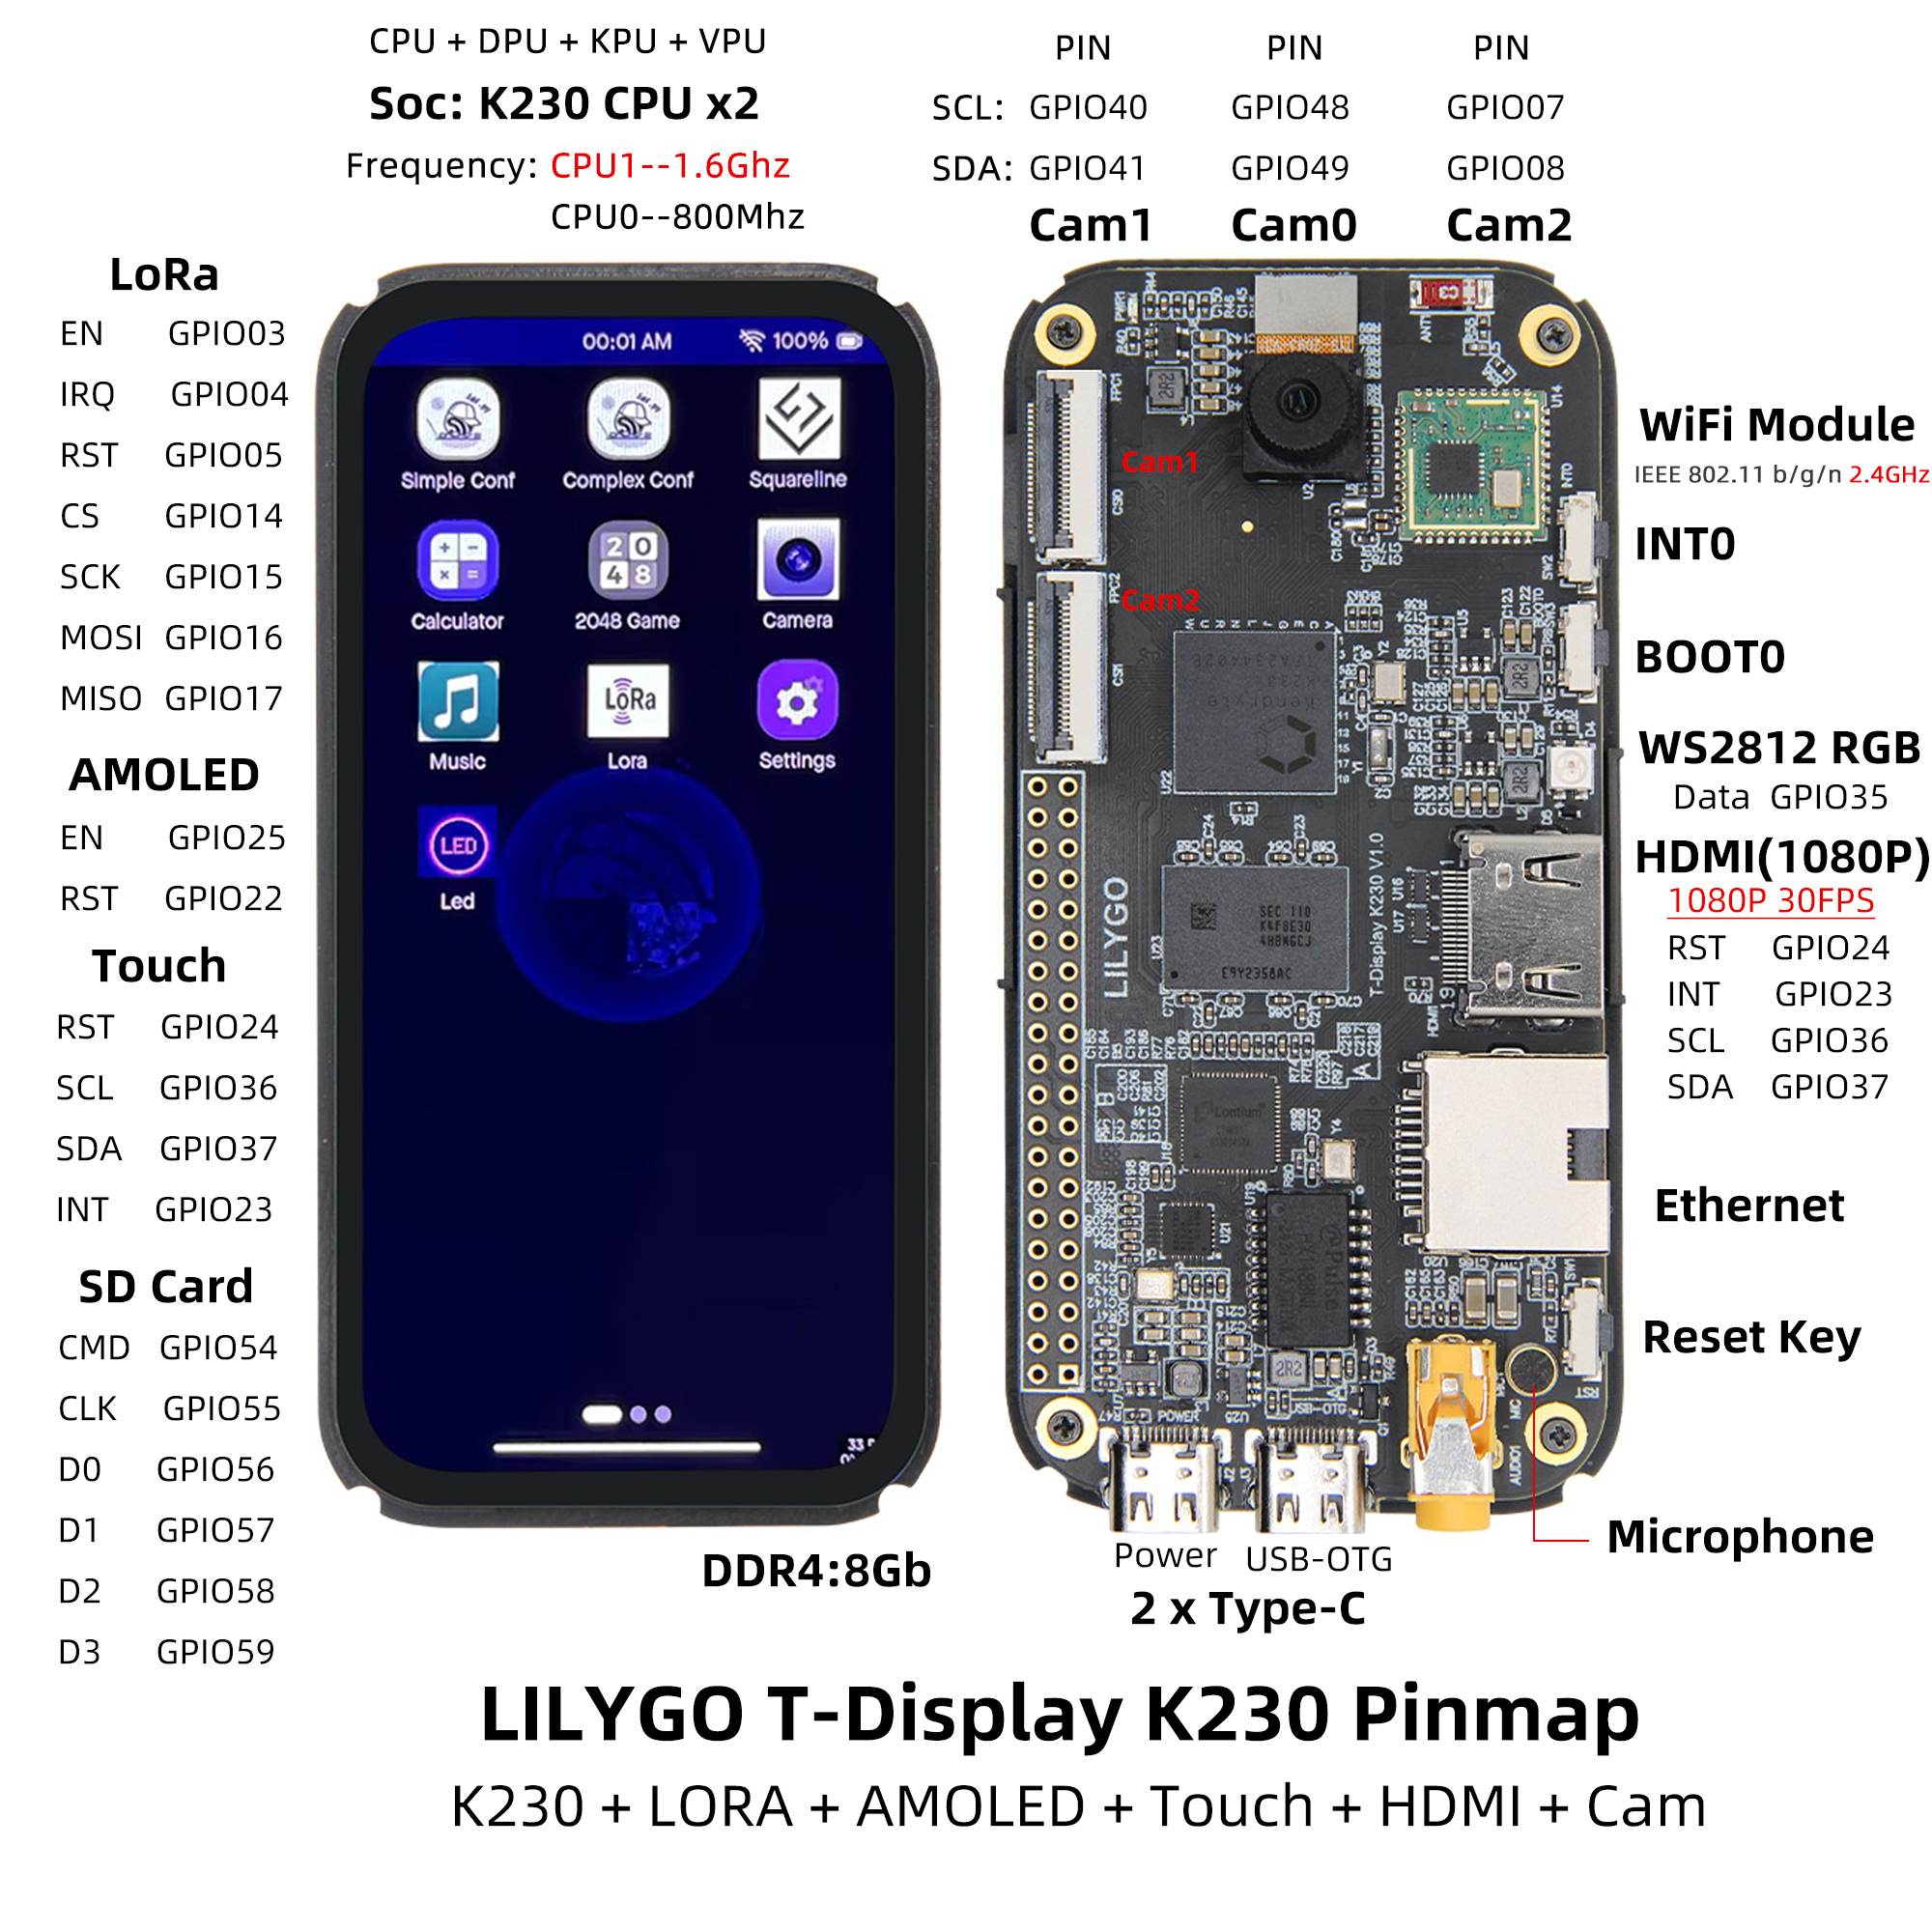
Pinout Diagram
Modules
1. Main Processor (K230)
- Chip: Canaan K230
- CPU Big Core: 1.6GHz RISC-V, 128bit RVV 1.0 extension
- CPU Small Core: 0.8GHz RISC-V
- NPU (KPU): Computing power close to 1.6TOPS, supports INT8/INT16
- Memory: 8Gb LPDDR4
- Codec: H.264/H.265 codec, JPEG codec
2. Co-processor (ESP32-S3)
- Chip: ESP32-S3-R8
- PSRAM: 8M
- FLASH: 16M
- Functions: Wi-Fi/Bluetooth connectivity, system auxiliary management
3. Screen
- Size: 4.1-inch AMOLED
- Resolution: 568×1232
- Interface: 2 lane MIPI DSI
- Touch: Capacitive touch screen (GT9895)
4. Camera
- Interface: 3 channels MIPI CSI-2
- Configuration: Default configured for one channel, supports up to 1x4lane + 1x2lane
- Speed: Up to 1.5Gbps
5. Communication Modules
- LoRa: SX1262, SX1280, supports 433~923MHz frequency bands
- Wi-Fi: 802.11b/g/n (ESP32-S3)
- Ethernet: IEEE 802.3u compatible
- Bluetooth: Bluetooth 5 (LE) (ESP32-S3)
6. Audio
- Output: 3.5mm audio interface
- Input: Microphone
Overview
| Component | Description |
|---|---|
| Main Processor | K230 Dual-core RISC-V (1.6GHz + 0.8GHz) |
| Co-processor | ESP32-S3-R8 |
| NPU | 1.6TOPS, supports AI inference acceleration |
| Memory | 8Gb LPDDR4 |
| Storage | 16MB FLASH + TF card expansion |
| Screen | 4.1-inch AMOLED (568×1232) |
| Camera | 3 channels MIPI CSI-2 |
| Video Output | HDMI 1080P@30FPS |
| LoRa | SX1262/SX1280 (433~923MHz) |
| Network | Wi-Fi + Ethernet |
| USB | 1 × POWER + 1 × USB 2.0 OTG (TYPE-C) |
| IO Interface | 2×20 dual-row expansion interface |
| Buttons | RST + BOOT + INT0 |
| Indicators | Power indicator + RGB light |
| Power | 5V/500mA |
| Dimensions | 104×51×15.5mm |
K230 SDK Quick Development Guide
K230 SDK Structure Introduction
| Level 1 Directory | Level 2 Directory | Description |
|---|---|---|
| configs | NA | Resource configuration (memory allocation planning) |
| output | NA | SDK compilation products |
| src | big | Big core RTSmart code |
| src | common | Big and small core common code |
| src | little | Small core Linux code |
| tools | docker | dockerfile |
| tools | doxygen | doxygen scripts and configuration files |
| tools | kconfig | |
| tools | gen_image.sh | Script to generate flashable images |
| tools | gen_image_cfg | Image partition configuration files |
| tools | tuning-tool-client | PC-side image debugging tool |
K230 SDK is a software development kit for K230 development boards, containing source code, toolchains, and other related resources needed for development based on Linux & RT-smart dual-core heterogeneous systems.
Setting Up Development Environment
K230 SDK needs to be compiled in a Linux environment, Ubuntu Linux 20.04 is recommended.
If you need to compile in a Windows environment, it is recommended to use WSL2 + Docker environment.
Using Docker Compilation Environment
Get docker compilation image
It is recommended to compile K230 SDK in a docker environment, you can directly use the following docker image:docker pull ghcr.io/kendryte/k230_sdkYou can confirm the docker image is successfully pulled using the following command:
docker images | grep k230_sdkNote: The docker image does not include toolchain by default. After downloading the source code, use the command 'make prepare_sourcecode' to automatically download the toolchain to the current compilation directory.
If you don't use the docker compilation environment but prefer to use native Linux for compilation, you can refer to tools/docker/Dockerfile to install the corresponding tools into your Linux system.
If the download speed is slow or unsuccessful, you can use tools/docker/Dockerfile to compile the docker image yourself. For details, please refer to K230 SDK Usage Instructions
Compiling K230 SDK
Download K230 SDK Source Code
git clone https://github.com/kendryte/k230_sdk
cd k230_sdk
make prepare_sourcecode
make prepare_sourcecodewill automatically download Linux and RT-Smart toolchain, buildroot package, AI package, etc. Please ensure this command executes successfully without any Errors. Download time and speed depend on actual network speed.
Start Compiling K230 SDK
Taking docker image compilation as an example:
Confirm the current directory is the
k230_sdksource code root directory,Use the following command to enter docker
docker run -u root -it -v $(pwd):$(pwd) -v $(pwd)/toolchain:/opt/toolchain -w $(pwd) ghcr.io/kendryte/k230_sdk /bin/bash
Select different config configurations for compilation based on different development boards or software functions. Compilation command format:
make CONF=xxx, for example:
To compile K230-USIP-LP3-EVB board image, execute
make CONF=k230_evb_defconfigcommand to start compilation
To compile CanMV-K230 board image, execute
make CONF=k230_canmv_defconfigcommand to start compilation
- The automatically downloaded toolchain in the external directory will be mapped to the
/opt/toolchain/directory in the docker image.
- The default parameter
-u rootspecifies docker to execute as root user, k230_sdk can be compiled without root permissions
- Please use the complete path
ghcr.io/kendryte/k230_sdkfor the docker image. If using a locally compiled docker image, please modify the name accordingly
Compilation Products Introduction
Taking the products generated by make CONF=k230_evb_defconfig compilation as an example:
k230_evb_defconfig/images
├── big-core
├── env.env
├── jffs2.env
├── little-core
├── sysimage-sdcard.img    # SD and eMMC non-secure boot image
├── sysimage-sdcard.img.gz # SD and eMMC non-secure boot image compressed package
├── sysimage-spinor32m.img # norflash non-secure boot image
├── sysimage-spinor32m.img.gz    # norflash non-secure boot image compressed package
└── sysimage-spinor32m_jffs2.img # norflash jffs2 non-secure boot image
Both TF card and eMMC can use thesysimage-sdcard.img image, or use sysimage-sdcard.img.gz decompressed to get this file.
Pre-compiled Image Download
If you don't want to compile the image yourself, you can download pre-compiled images and use them directly for flashing.
** as a release branch, compiled release images are automatically published to the Release page. (Supported from v1.4 version)
2.Pre-compiled release images: Please visit Canaan Developer Community, then in the K230/Images category, download the required image files. For evb devices downloadk230_evb*.img.gz, for canmv devices download k230_canmv*.img.gz.
The downloaded images are in .gz compressed format by default, which needs to be decompressed first before flashing.
The K230 micropython image supports different functions compared to K230 SDK.
Flashing Image Files
Flashing TF Card
If using Linux to flash TF card, you need to first confirm the TF card name in the system /dev/sdx, and replace /dev/sdx in the following command.
sudo dd if=sysimage-sdcard.img of=/dev/sdx bs=1M oflag=sync
If using Windows for flashing, it is recommended to use the rufus tool.
For other more detailed flashing methods, please refer to K230 SDK documentation.
Power On and Boot
K230 EVB Development Board Power On and Boot
K230 EVB supports multiple boot methods including SDCard, eMMC, norflash, etc. Users can switch between different boot modes by changing the boot switchsettings on the board.
For development convenience, it is recommended to prepare a TF card and set the boot switch to SD card boot mode. Later, you can consider burning the image file to eMMC.
- Please first confirm that the startup switch SW1 is set to the SD card startup mode (for details, please refer to Power-on Method
- Insert the TF card with the completed burning into the TF card slot of the development board
- Connect the power supply to the development board
- Pull the power switch K1 to the ON position, and the system can be powered on and started
- If you have connected the serial port, you can see the startup log output in the serial port.
CanMV-K230 Development Board Power On and Boot
K230 CanMV-K230 development board supports SDCard boot method and HDMI output display. Therefore, you need to prepare a TF card, and it is recommended to prepare an HDMI monitor.
- Insert the TF card that has been programmed into the TF card slot of the development board.
- Power on the development board. At this point, the system can be powered on and started.
After the system is powered on, by default, there will be two serial port devices, which can be used respectively to access the small-core Linux and the large-core RTSmart.
The default username for the small-core Linux is "root" and the password is empty. In the large-core RTSmart system, an application will automatically start at boot. You can press the q key to exit to the command prompt terminal.
base platform:
Ubuntu 20.04
Refer to BUILD, you can use Docker or local environment for compilation, compilation speed is faster.Or refer to K230 CanMV Custom Firmware
- Flashing:
Under Linux, directly use the dd command for flashing. Under Windows, use flashing tools. Refer to K230 CanMV How to Flash Firmware.
Operator:
Compile firmware:
      cd canmv_k230
      time make log
canmv_k230/output/k230_canmv_v3p0 generates CanMV-K230-V3P0_rtsmart_localnncase_v2.9.0.img which can be burned onto an SD card
- Compile app:
Change to current directory canmv_k230
      cd canmv_k230/src/rtsmart/mpp
      source build_env.sh
      cd userapps/sample/sample_display
      make
In the sample/elf directory, generate sample_display.elf
Default app: sample_display
Rename sample_display.elf to app.elf, copy to the SD card's sdcard partition, reboot, and it will run by default.