T-Beam Supreme get it now

Overview
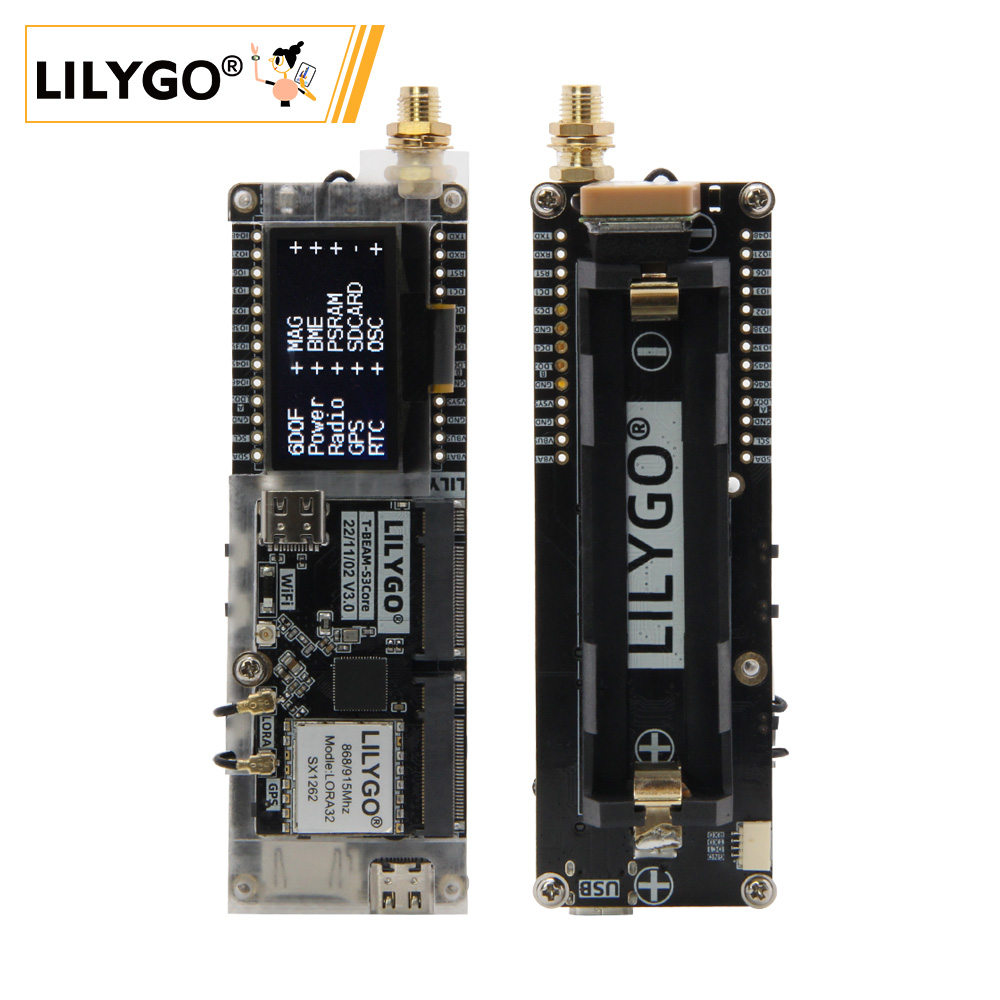
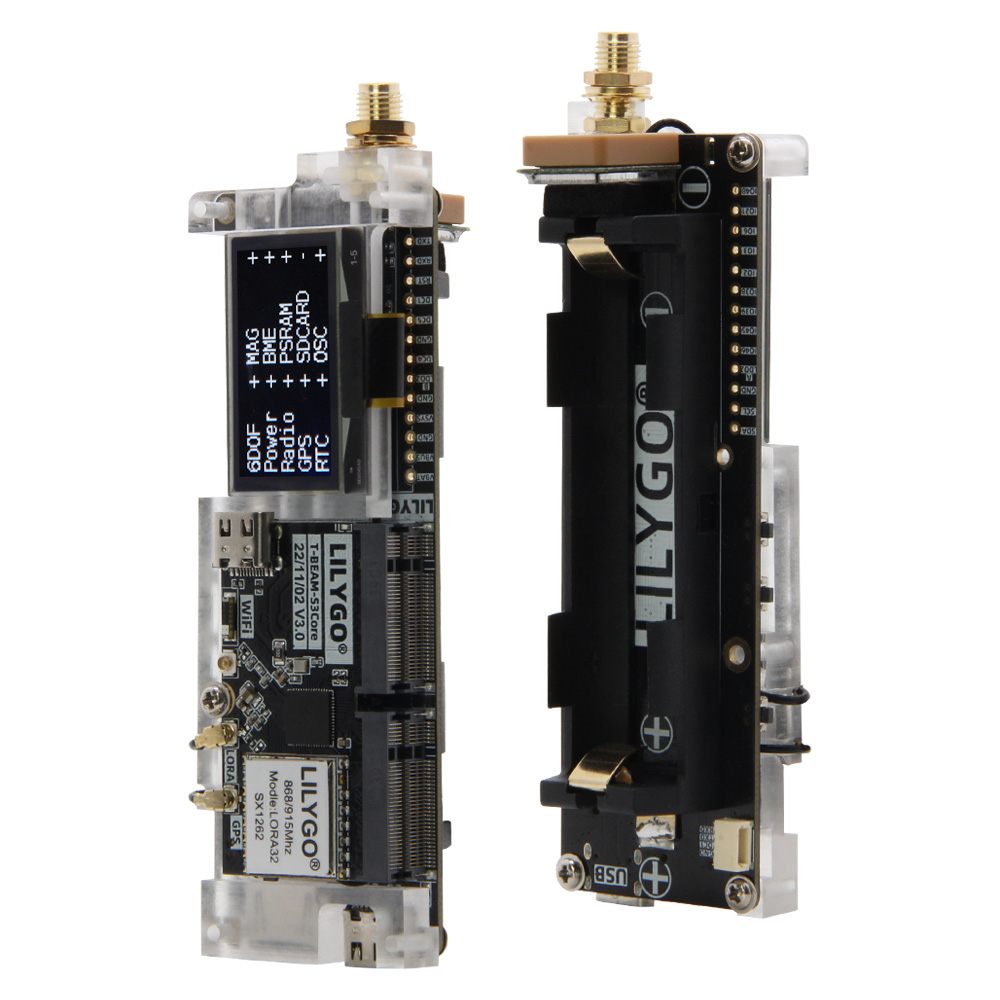
T-Beam-Supreme V3.0 is a high-performance multifunctional IoT development board based on the ESP32-S3FN8 dual-core processor, supporting Wi-Fi 802.11 b/g/n and Bluetooth 5.0. It integrates a SX1262 LoRa module (433/868/915/923 MHz), selectable MAX-M10S or L76K GPS module, 1.3-inch SH1106 OLED (128 × 64), AXP2101 power management, and onboard sensors including a six-axis IMU (QMI8658), environmental sensor (BME280), and magnetometer (QMC6309/6310). Equipped with 8 MB PSRAM and 8 MB Flash, TF card slot, QWIIC interface, and 3.7 V 18650 battery support.
Suitable for smart hardware, environmental monitoring, LoRa long-range communication, and IoT node development scenarios.
Quick Start
Example Support
| Example | PlatformIO/Arduino | ESP-IDF | Description |
|---|---|---|---|
| LilyGo-LoRa-Series | ✓ | LoRa, GPS, OLED, Sensor examples |
Available examples
./examples/
├── ArduinoLoRa          # SX1276/SX1278 only
├── GPS                  # TinyGPS, UBlox examples
├── LoRaWAN              # LMIC_Library_OTTA, RadioLib_OTAA
├── OLED                 # SH1106 display examples
├── PMU                  # Power management examples
├── RadioLibExamples     # SX1262/LR1121 Transmit/Receive
├── Sensor               # BME280, QMI8658, QMC6310, PCF8563
└── Factory              # Factory test examples
PlatformIO
- Install Visual Studio Code and Python
- Search for and install the PlatformIO IDE extension in VS Code
- After restarting VS Code, click File → Open Folder → select the
LilyGo-LoRa-Seriesdirectory - Wait for dependency libraries to install
- Open
platformio.ini, underdefault_envsuncomment your board name - Uncomment one
src_dir = xxxxline (only one active at a time) - Click ✓ to compile, then connect via USB-C and click → to upload
Arduino
- Install Arduino IDE
- Install Arduino ESP32
- Copy all folders from the
libdirectory to your Arduino libraries folder:- Windows:
C:\Users\{Username}\Documents\Arduino - macOS:
/Users/{Username}/Documents/Arduino - Linux:
/home/{Username}/Arduino
- Windows:
- Open the example sketch from the
examplesdirectory - In Tools → Board, configure:
| Arduino IDE Setting | Value |
|---|---|
| Board | ESP32S3 Dev Module |
| Port | Your port |
| USB CDC On Boot | Enable |
| CPU Frequency | 240MHZ(WiFi) |
| Core Debug Level | None |
| USB DFU On Boot | Disable |
| Erase All Flash Before Sketch Upload | Disable |
| Events Run On | Core1 |
| Flash Mode | QIO 80MHZ |
| Flash Size | 8MB(64Mb) |
| Arduino Runs On | Core1 |
| USB Firmware MSC On Boot | Disable |
| Partition Scheme | 8M Flash(3M APP/1.5MB SPIFFS) |
| PSRAM | QSPI PSRAM |
| Upload Mode | UART0/Hardware CDC |
| Upload Speed | 921600 |
| USB Mode | CDC and JTAG |
| Programmer | Esptool |
- In
utilities.h, uncomment your board model (T_BEAM_S3_SUPREME_SX1262orT_BEAM_S3_SUPREME_LR1121) - Click Upload
Development Platforms
Video
Key Features
- ESP32-S3FN8 dual-core LX7 @ 240 MHz, Wi-Fi + Bluetooth 5.0
- SX1262 LoRa (433/868/915/923 MHz) or LR1121 (Sub-1G + 2.4G)
- Selectable GPS: MAX-M10S (high accuracy) or L76K (cost-optimized)
- 1.3-inch SH1106 OLED display (128 × 64)
- Six-axis IMU: QMI8658
- Environmental sensor: BME280 (temperature, humidity, pressure)
- Magnetometer: QMC6309 / QMC6310U / QMC6310N
- RTC: PCF85063ATL
- AXP2101 power management, supports 3.7 V 18650 battery
- 8 MB Flash + 8 MB PSRAM + TF card slot
- QWIIC / STEMMA QT expansion interface
Product Parameters
| Feature | Specification |
|---|---|
| MCU | ESP32-S3FN8 @ Dual-core LX7, 240 MHz |
| Flash | 8 MB |
| PSRAM | 8 MB (QSPI) |
| Wi-Fi | 2.4 GHz 802.11 b/g/n |
| Bluetooth | Bluetooth 5.0 LE |
| LoRa | SX1262 (433/868/915/923 MHz) / LR1121 |
| GPS | MAX-M10S or L76K (selectable) |
| Display | 1.3-inch SH1106 OLED, 128 × 64, I2C |
| IMU | QMI8658 (6-axis) |
| Environmental Sensor | BME280 (temperature / humidity / pressure) |
| Magnetometer | QMC6309 / QMC6310U / QMC6310N |
| RTC | PCF85063ATL (I2C) |
| Power Management | AXP2101 |
| USB Input | 3.9 V – 6 V (USB-C) |
| Battery | 3.7 V 18650 |
| Storage Expansion | TF card slot |
| Dimensions | 114 × 33 × 28 mm |
I2C Device Addresses
| Device | 7-bit Address | Bus |
|---|---|---|
| OLED (SH1106) | 0x3C / 0x3D | I2C Bus 0 |
| MAG (QMC6310U / QMC6310N) | 0x1C / 0x3C | I2C Bus 0 |
| MAG (QMC6309) | 0x7C | I2C Bus 0 |
| BME280 | 0x77 | I2C Bus 0 |
| RTC (PCF8563) | 0x51 | I2C Bus 1 |
| PMU (AXP2101) | 0x34 | I2C Bus 1 |
AXP2101 Power Channels
| Channel | Peripheral |
|---|---|
| DC1 | ESP32-S3 |
| DC3 / DC4 / DC5 | External M.2 Socket |
| ALDO1 | BME280 + Display + MAG Sensor |
| ALDO2 | Sensor |
| ALDO3 | Radio |
| ALDO4 | GPS |
| BLDO1 | SD Card |
| BLDO2 | External pin header |
GPS backup power is provided by the 18650 battery. Remove the battery and GPS hot start will not be available.
Pin Diagram
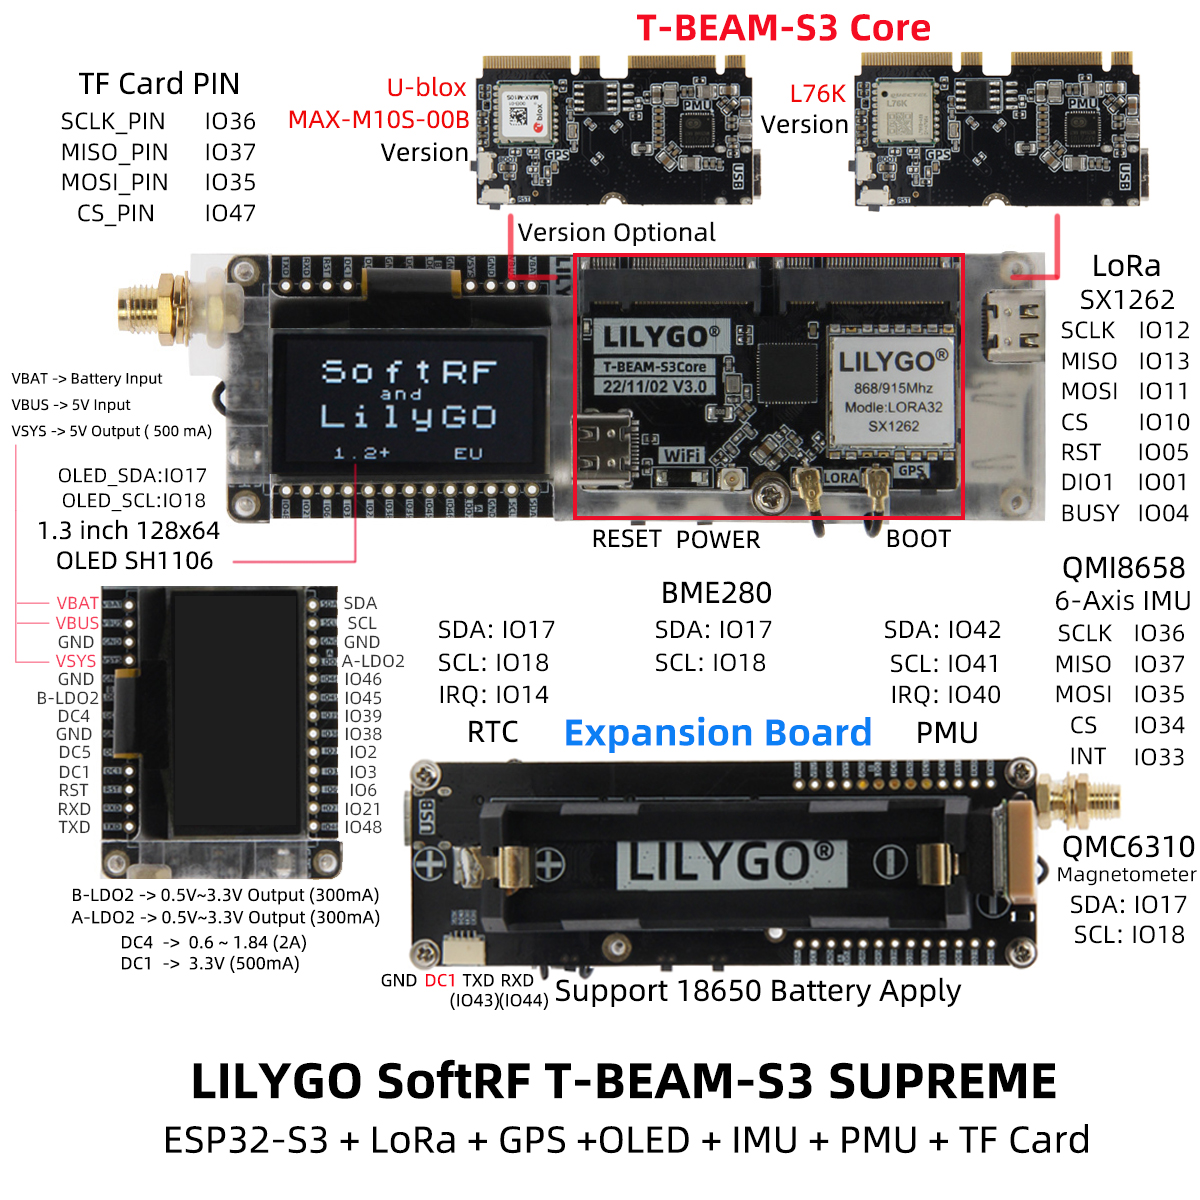
Pin Mapping
| Pin Name | GPIO | Available |
|---|---|---|
| Uart1 TX | 43 (QWIIC) | ✅ |
| Uart1 RX | 44 (QWIIC) | ✅ |
| I2C SDA | 17 | ❌ |
| I2C SCL | 18 | ❌ |
| SPI MOSI | 35 | ❌ |
| SPI MISO | 37 | ❌ |
| SPI SCK | 36 | ❌ |
| SD CS | 47 | ❌ |
| GNSS TX | 8 | ❌ |
| GNSS RX | 9 | ❌ |
| GNSS PPS | 6 | ❌ |
| GNSS Wake-up (L76K only) | 7 | ❌ |
| LoRa SCK | 12 | ❌ |
| LoRa MISO | 13 | ❌ |
| LoRa MOSI | 11 | ❌ |
| LoRa RESET | 5 | ❌ |
| LoRa DIO1/DIO9 | 1 | ❌ |
| LoRa BUSY | 4 | ❌ |
| LoRa CS | 10 | ❌ |
| IMU (QMI8658) CS | 34 | ❌ |
| IMU (QMI8658) INT | 33 | ❌ |
| RTC INT | 14 | ❌ |
| BOOT Button | 0 | ❌ |
| PMU IRQ | 40 | ❌ |
| PMU SDA | 42 | ❌ |
| PMU SCL | 41 | ❌ |
Dimension Diagram
Schematic
Datasheet
Software Development
Dependent Libraries
FAQ
Q. How to choose between GPS module versions? A. MAX-M10S has higher accuracy and lower power consumption; L76K has better cost advantage. Choose based on positioning accuracy requirements and budget.
Q. LoRa communication distance is not ideal? A. Check antenna connection, ensure use in open environment, and adjust LoRa parameters (spreading factor, bandwidth, etc.).
Q. Battery life is short? A. Enable deep sleep mode, disable unused sensors and peripherals, and select low-power operation modes.
Q. Cannot flash the program? A. Ensure USB CDC On Boot is enabled. Hold the BOOT button and click RESET to enter download mode.
Q. T-Beam Supreme has three magnetometer variants? A. Yes: QMC6310N, QMC6310U, and QMC6309, each with a different I2C device address. Check the label on your board.
Version History
| Version | Release Date | Update Description |
|---|---|---|
| T-Beam-Supreme V3.0 | — | Initial release |