T-Lora Pager get it now
Overview
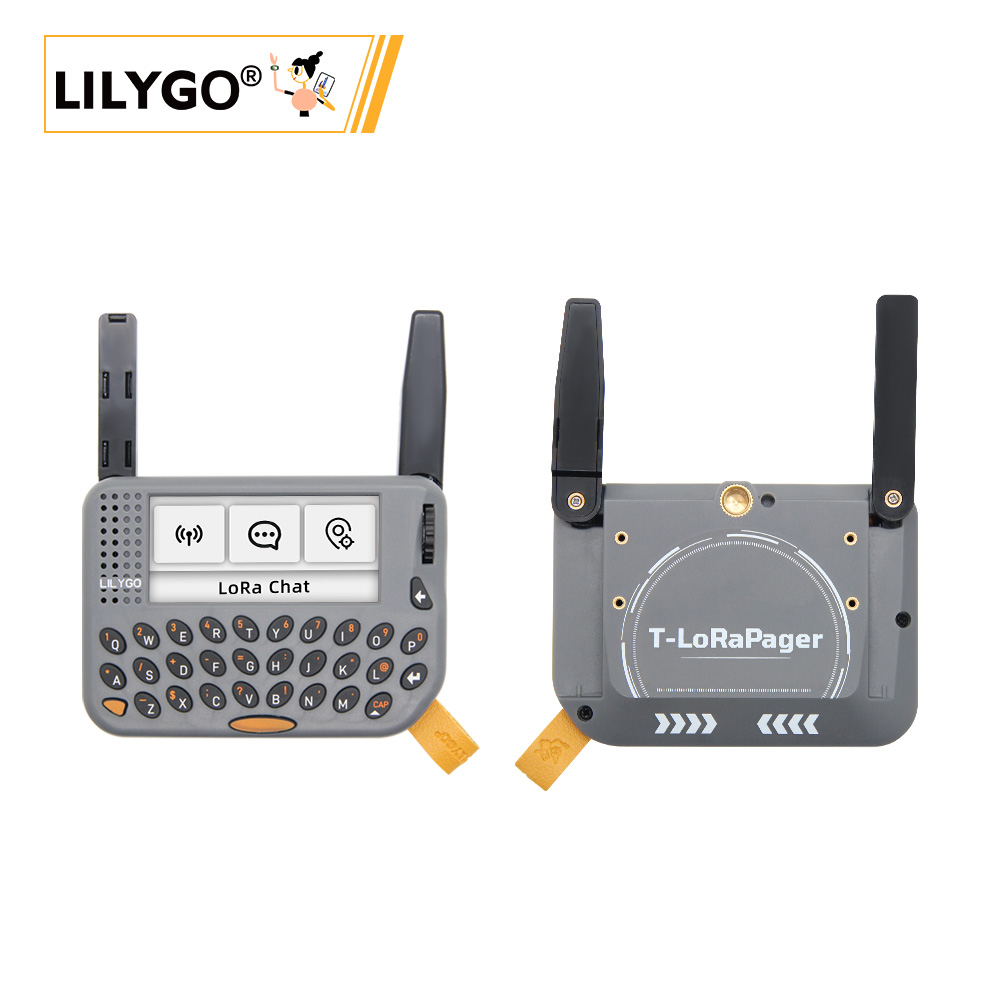
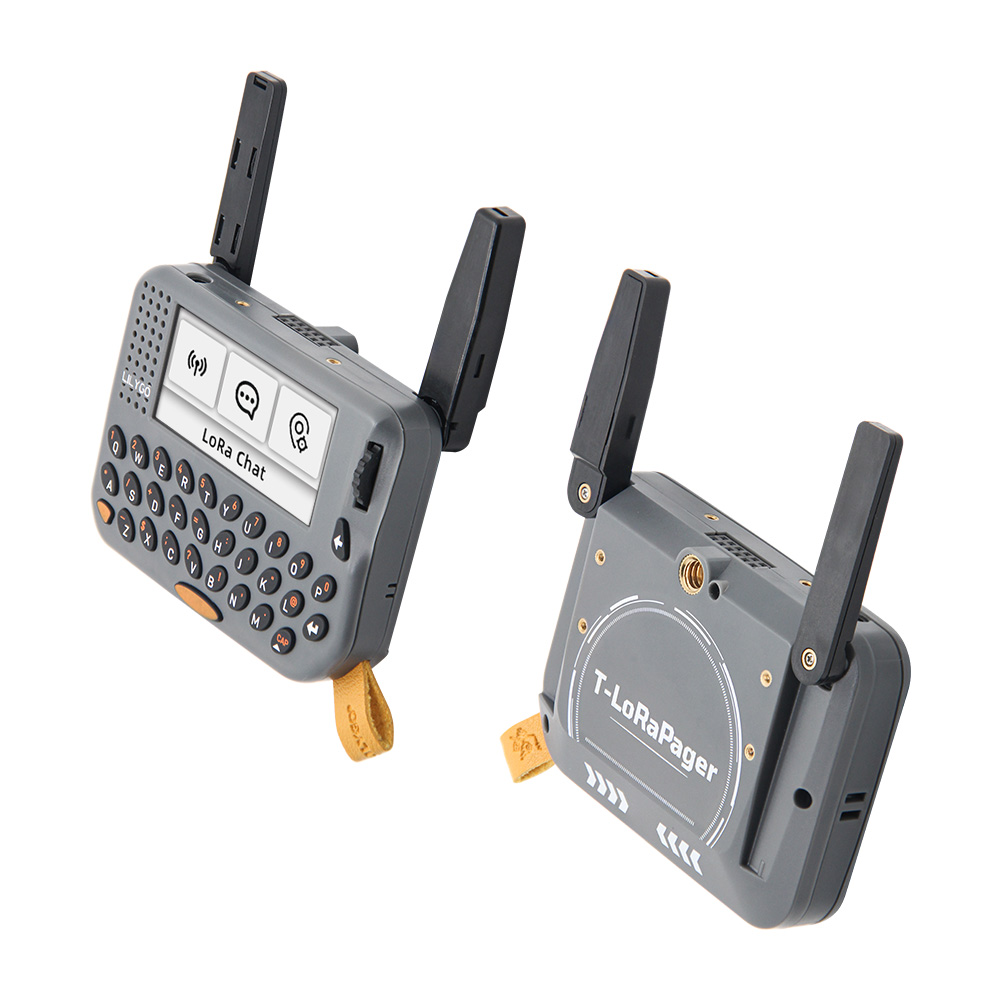
T-LoraPager is a handheld AIOT programmable development device launched by LILYGO, integrating ESP32-S3 high-performance Wi-Fi/Bluetooth dual-mode chip with multiple wireless communication modules. The device features a compact appearance and foldable external antenna design, ensuring wireless performance while maintaining aesthetics. Multiple version options are provided, mainly differing in LoRa modules (LR1121, SX1262 or CC1101), allowing users to choose according to application requirements.
The development board is feature-rich, integrating QWERT keyboard, AI-enabled IMU (BHI260AP), 2.33-inch strip screen (480×222 resolution), U-blox GPS module (MIA-M10Q), RFID/NFC, RTC circuit, TI power management chip, ES8311 audio codec (supporting microphone, speaker, headphone), rotary encoder, GPIO expansion interface, etc. The back design includes 1/4 fixed screw interface and M2 screw pillars, with a lanyard included for easy carrying and fixing. The factory firmware includes UI Demo designed by LILYGO, enabling smooth interaction through the encoder, suitable for smart wearables, IoT positioning, data collection and other scenario development.
Quick Start
Example Support
| Example | PlatformIO/Arduino | ESP-IDF | Description |
|---|---|---|---|
| UI Demo | ✓ | Factory UI Demo Program | |
| LoRa Example | ✓ | LoRa Communication Example | |
| GPS Example | ✓ | GPS Positioning Example | |
| Keyboard Example | ✓ | Keyboard Input Example | |
| Audio Example | ✓ | Audio Playback Example |
PlatformIO
- Install Visual Studio Code.
- Search for and install "PlatformIO IDE" in extensions.
- Download T-LoraPager project code from GitHub.
- Open the project folder in VS Code, edit the
platformio.inifile to select the desired environment. - Connect the device, compile and flash the program.
Arduino
- Install Arduino IDE
- Install Arduino ESP32 V3.3.0-alpha1 or higher or latest version
- Tip: Arduino Manager URL: https://espressif.github.io/arduino-esp32/package_esp32_dev_index.json
- Download LilyGoLib library
- Open
Arduino IDE->Sketch->Include Library->Add .ZIP Library->Select the library zip file downloaded in step 3 - Install LilyGoLib-ThirdParty
- Copy all directories from LilyGoLib-ThirdParty to the ArduinoIDE libraries directory. If there is no
librariesdirectory, please create it manually. - Please note: do not copy the
LilyGoLib-ThirdPartydirectory itself, but copy all folders under that directory to the libraries directory - How to find library file location on your computer, please refer here
- Windows:
C:\Users\{Username}\Documents\Arduino - macOS:
/Users/{Username}/Documents/Arduino - Linux:
/home/{Username}/Arduino
- Windows:
- Copy all directories from LilyGoLib-ThirdParty to the ArduinoIDE libraries directory. If there is no
Please note that the libraries in LilyGoLib-ThirdParty are not necessarily the latest versions. Before confirming the hardware is working properly, please do not upgrade the dependent library versions. ArduinoIDE will prompt that new library versions are available for upgrade every time it opens. Please confirm normal operation before attempting to update to the latest versions. If you encounter issues, please revert to the dependent library versions that worked properly.
File->Examples->LilyGOLib->helloworldTools->Board->esp32, please select the corresponding configuration from the table below
| Arduino IDE Setting | Value |
|---|---|
| Board | LilyGo-T-LoRa-Pager |
| Port | Your port |
| USB CDC On Boot | Enabled |
| CPU Frequency | 240MHZ(WiFi) |
| Core Debug Level | None |
| USB DFU On Boot | Disable |
| Erase All Flash Before Sketch Upload | Disable |
| Events Run On | Core 1 |
| JTAG Adapter | Disable |
| Arduino Runs On | Core 1 |
| USB Firmware MSC On Boot | Disable |
| Partition Scheme | 16M Flash(3M APP/9.9MB FATFS) |
| Board Revision | Radio-SX1262 |
| Upload Mode | UART0/Hardware CDC |
| Upload Speed | 921600 |
| USB Mode | CDC and JTAG |
- Board Revision Option, please select according to the actual purchased RF type. Current options include:
- Radio-SX1262 (Sub 1G LoRa)
- Radio-SX1280 (2.4G LoRa)
- Radio-CC1101 (Sub 1G (G)MSK, 2(G)FSK, 4(G)FSK, ASK, OOK)
- Radio-LR1121 (Sub 1G + 2.4G LoRa)
- Radio-SI4432 (Sub 1G ISM)
- Select
Port - Click
Upload, wait for compilation and writing to complete - If unable to upload the program or the USB device keeps popping up on the computer, please manually put the device into download mode. How to enter download mode, please refer to here
- If there is no serial message output, please check if USB CDC ON Boot is set to Enabled.
- The board revision varies according to the actual RF module model. The current default version is SX1262.
- This library depends on the latest arduino-esp32 version. If it is lower than V3.3.0-alpha1, it will report an error.
Development Platforms
Video
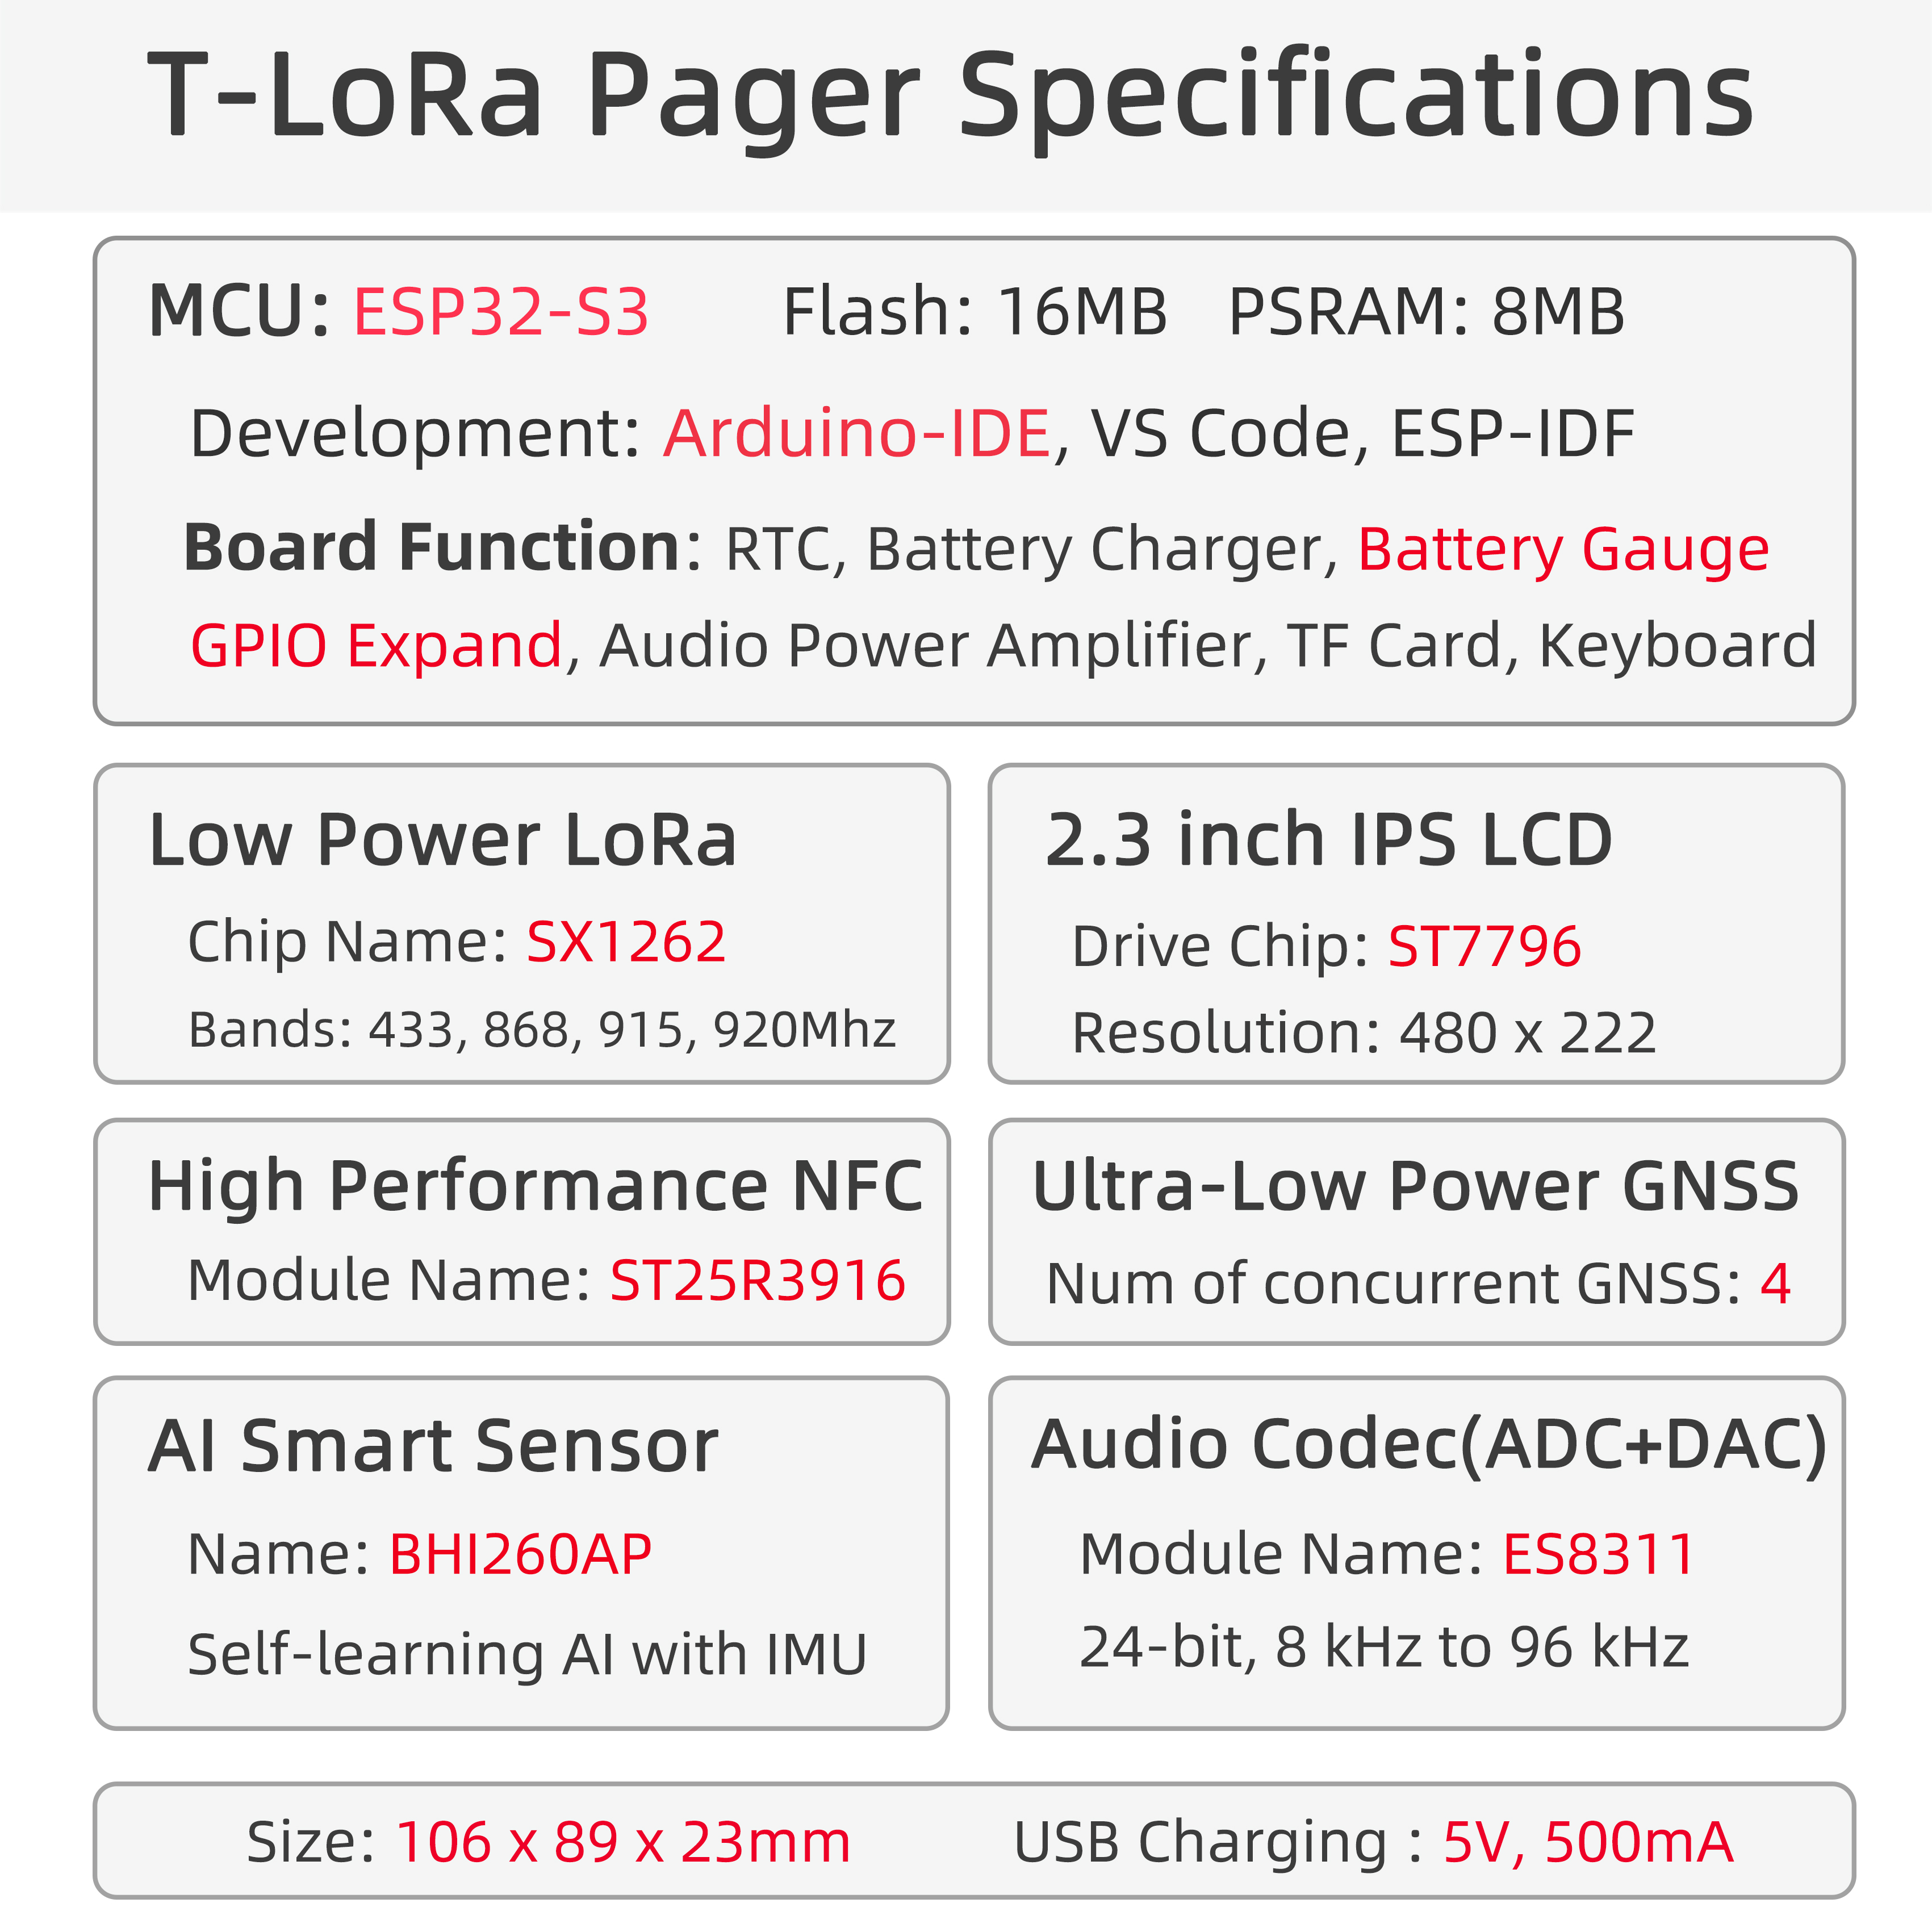
Key Features
- ESP32-S3 high-performance Wi-Fi / Bluetooth 5 (LE) dual-mode chip
- Multiple LoRa module options: SX1262 (433–920 MHz), LR1121 (Sub-1G + 2.4G), CC1101 (Sub-1G), SX1280 (2.4G), SI4432
- 2.33-inch IPS LCD display (480 × 222, ST7796, SPI)
- QWERT keyboard (TCA8418) + rotary encoder input
- AI-enabled IMU: Bosch BHI260AP
- U-blox MIA-M10Q GNSS (4-constellation concurrent)
- RFID / NFC: ST25R3916 (SPI)
- ES8311 audio codec with microphone, speaker, and headphone support (24-bit, 8–96 kHz)
- 16 MB Flash + 8 MB PSRAM
- TF card slot (up to 32 GB, FAT32)
- RTC: NXP PCF85063A
- TI power management: BQ25896 charger + BQ27220 fuel gauge
- Haptic feedback: TI DRV2605
- 1/4-inch fixed screw interface + 4 × M2 mounting holes + lanyard support
- Dimensions: 106 × 89 × 23 mm
Product Parameters
| Features | Params |
|---|---|
| SOC | ESP32-S3 @ Dual-core Xtensa LX7 processor, 240MHz main frequency |
| Flash | 16MB (QSPI) |
| PSRAM | 8MB (QSPI) |
| Wi-Fi | 2.4 GHz Wi-Fi |
| USB | USB OTG, USB Serial/JTAG. |
| Display | 2.33" @ 480 × 222, ST7796 |
| Display Backlight Driver | AW9364 16-Level Led Driver |
| GNSS Module | UBlox MIA-M10Q |
| LoRa | 433 MHz ~ 920 MHz @ Semtech SX1262 (Optional LR1121 / CC1101) |
| NFC | ST ST25R3916 |
| Smart sensor | Self-learning AI @ AI6-axis IMU, Bosch BHI260AP |
| Real-Time Clock | NXP PCF85063A |
| Battery Charger | Ti BQ25896 |
| Battery Gauge | Ti BQ27220 |
| Haptic driver | Ti DRV2605 |
| Audio Codec | 24-bit @ 8k-96kHz, ES8311, I2S protocol |
| Speaker | Nsiway NS4150B (3W Class D) |
| Microphone | #FIXME |
| Keyboard | 34keys @ TCA8418 |
| Rotary Encoder | #FIXME |
| GPIO Expand | XINLUDA XL9555 |
| SD Card Socket | Maximum 32GB (FAT32 format) |
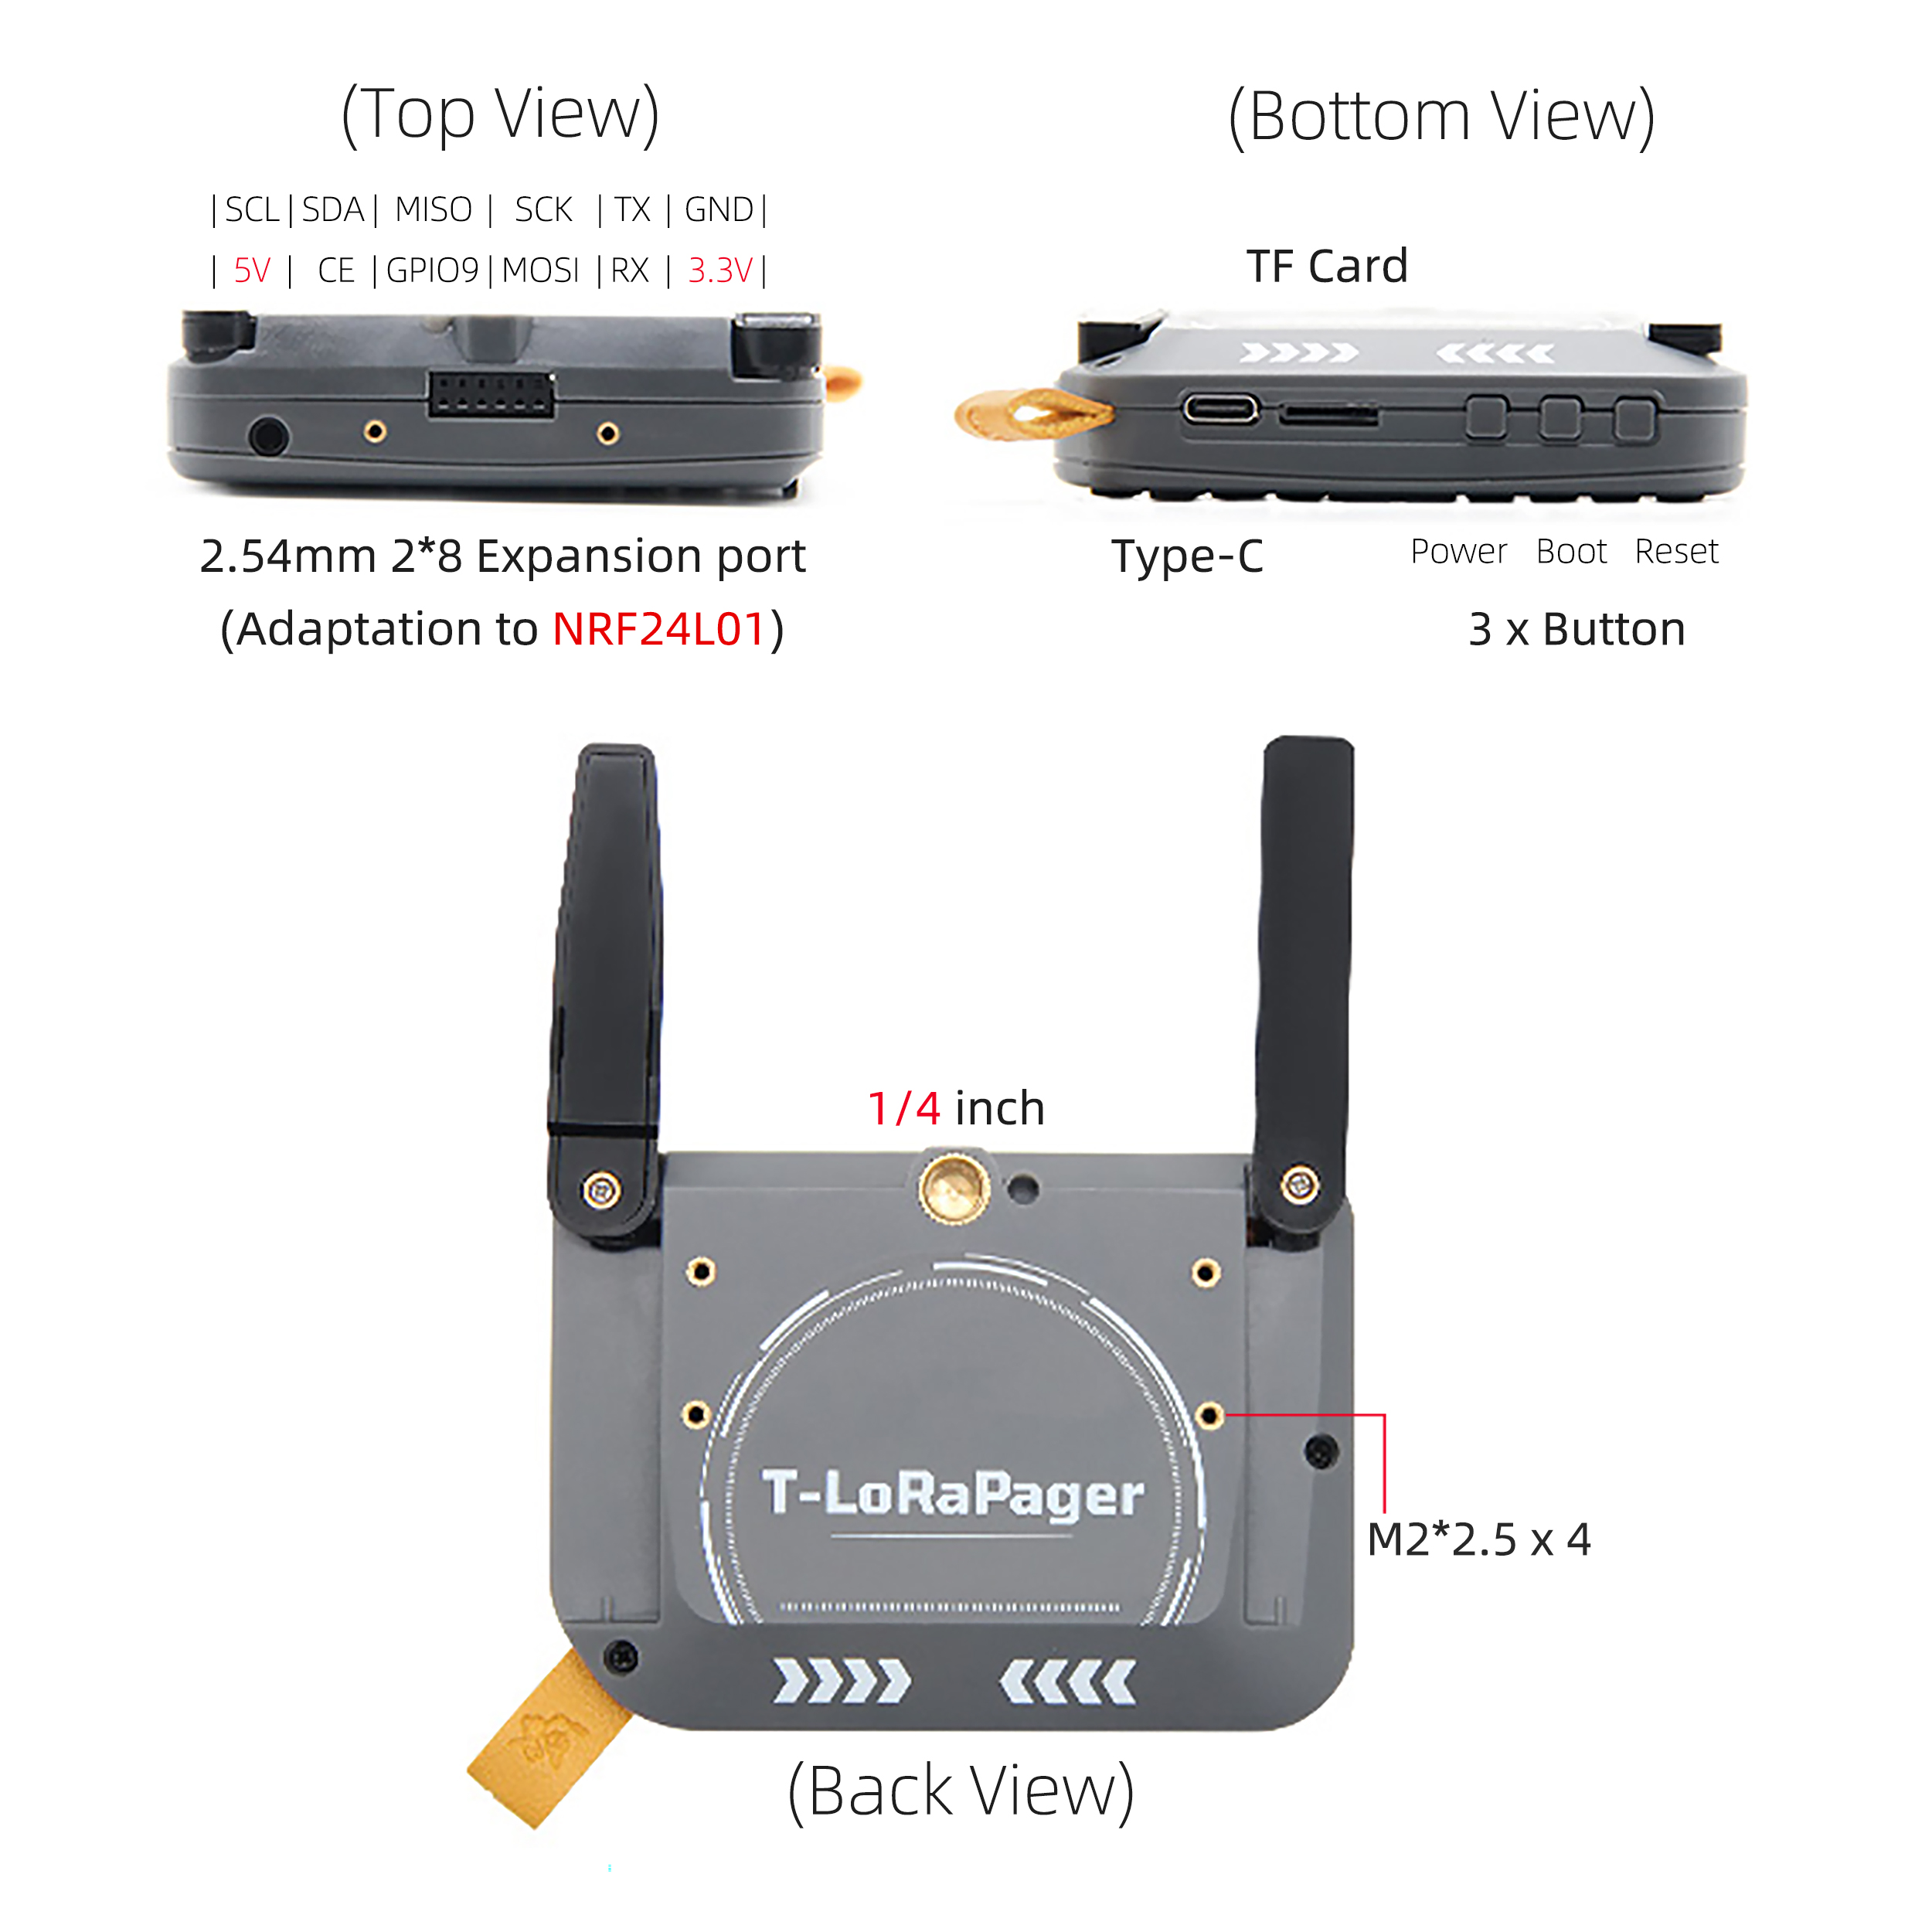
Pin Diagram
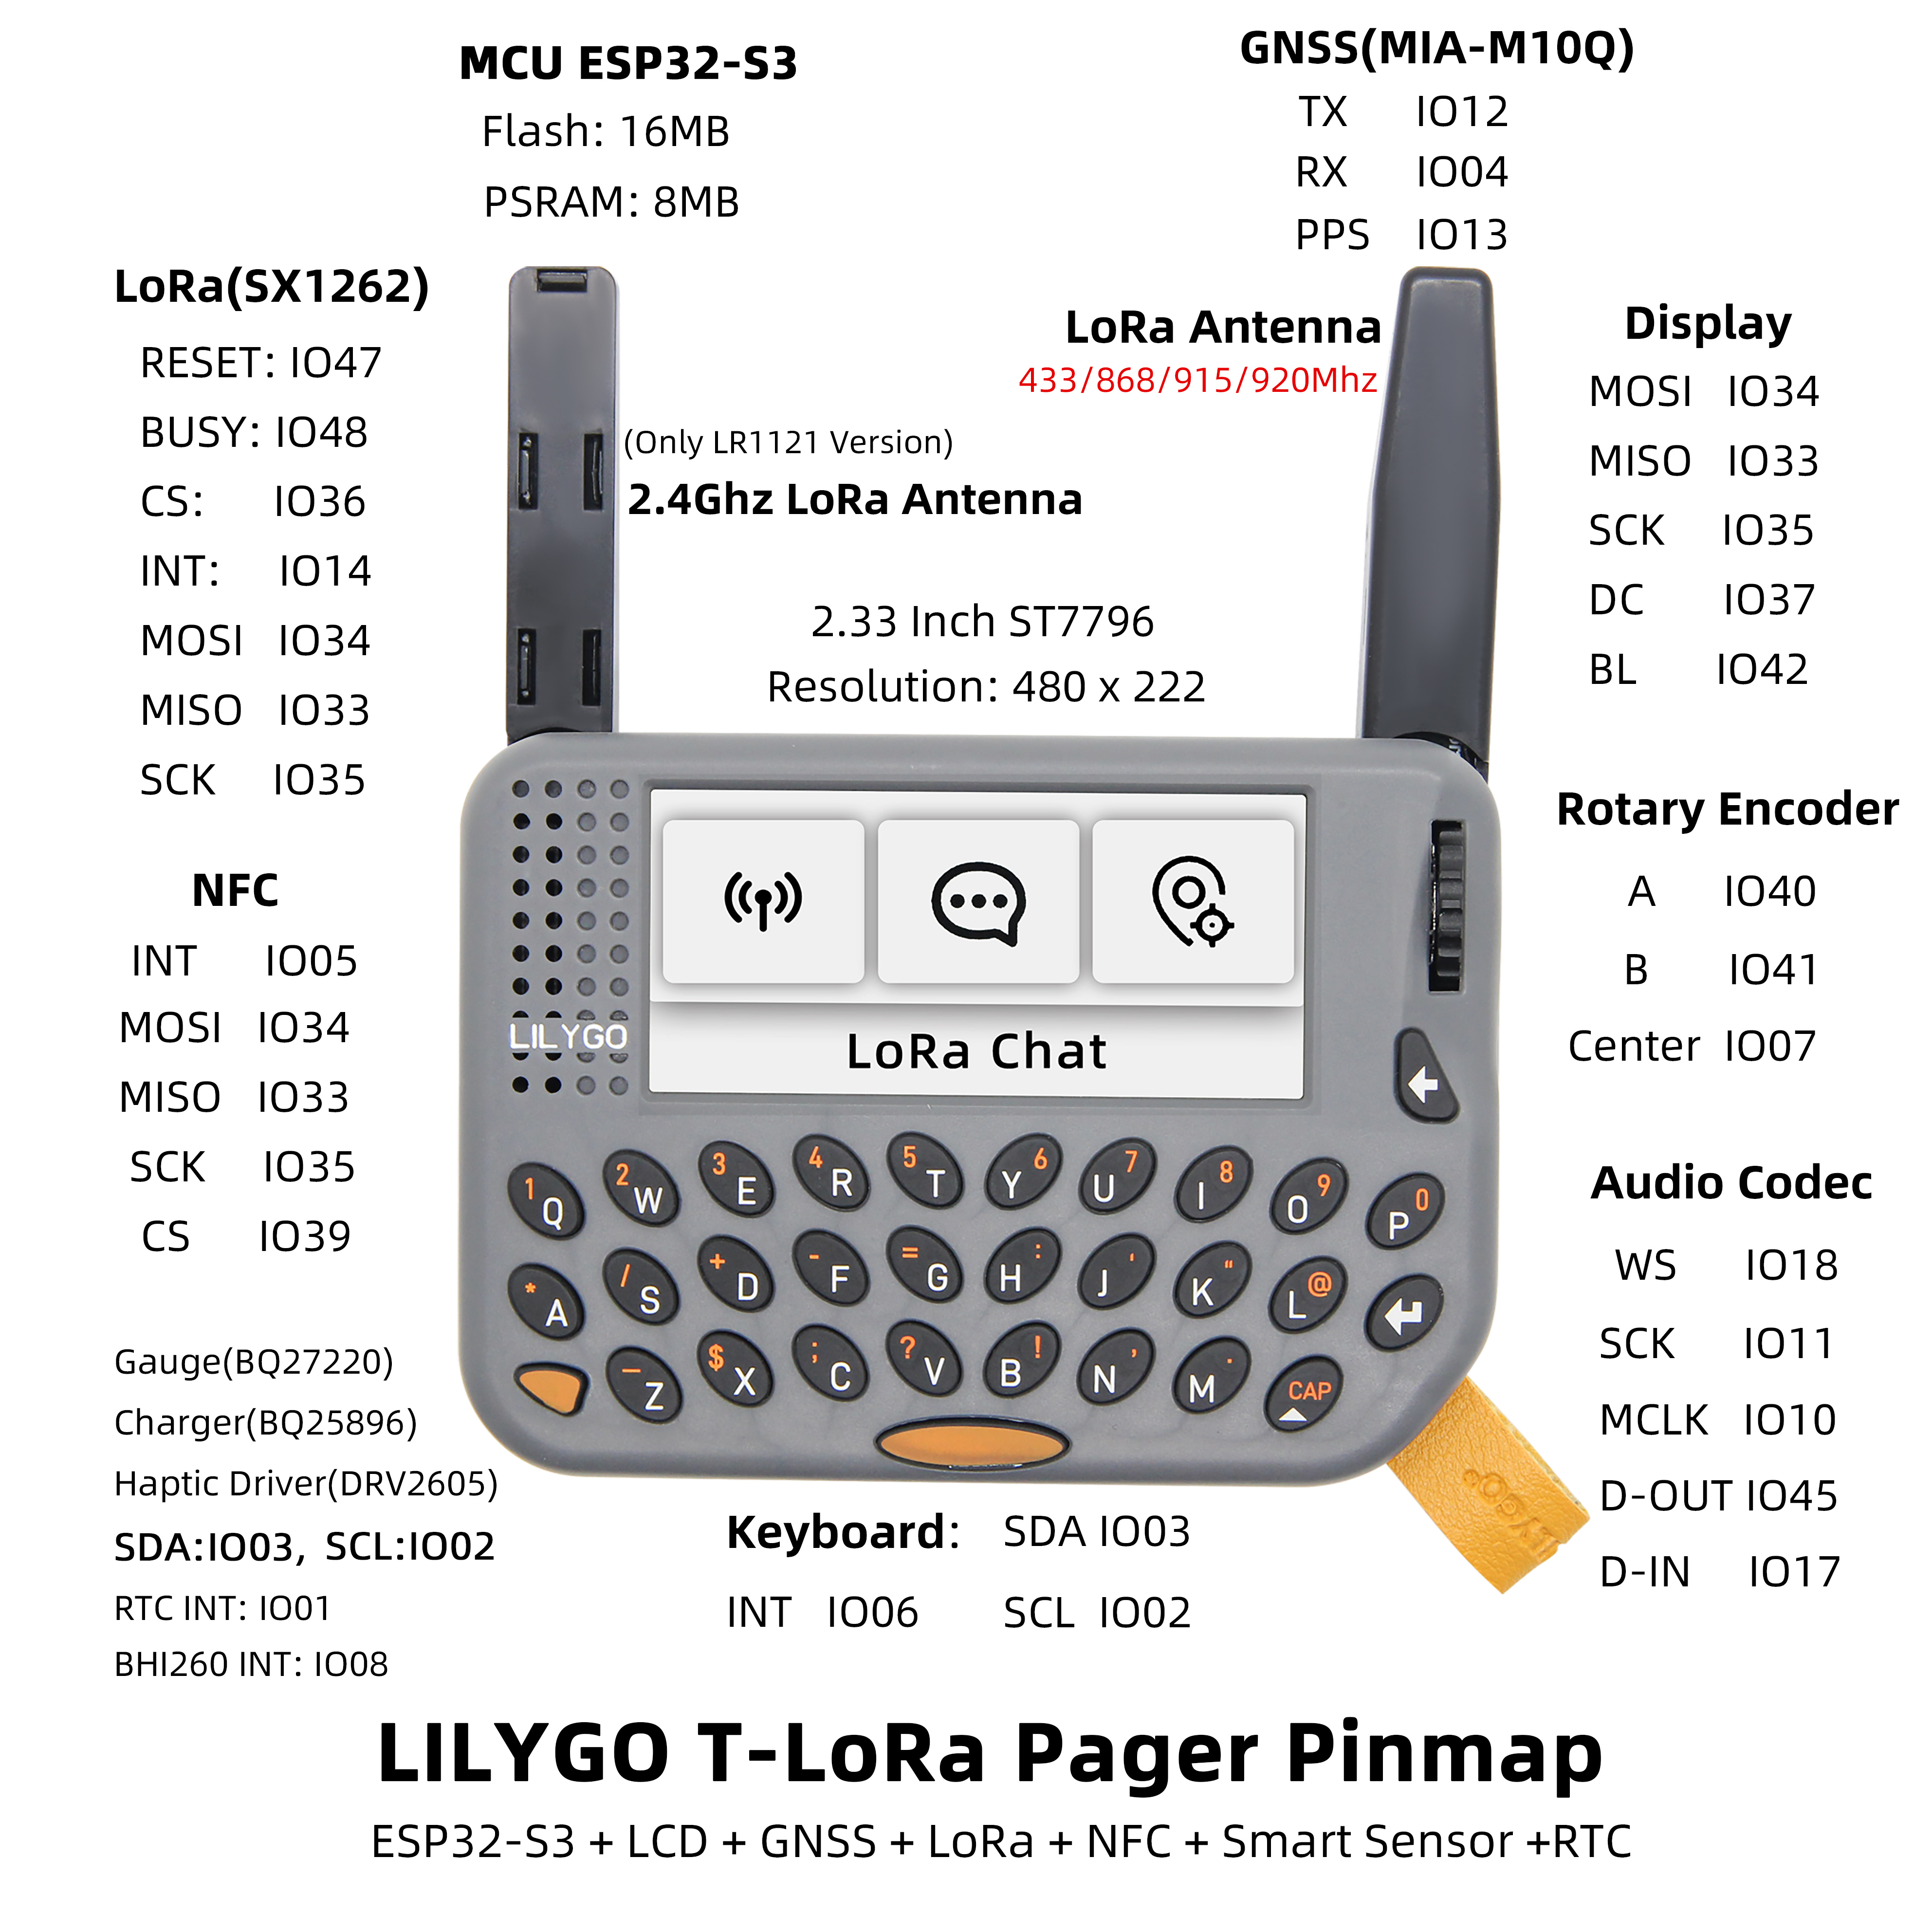
Display
| ST7796 | BL | RESET | SCK | MOSI | MISO | CS | DC |
|---|---|---|---|---|---|---|---|
| ESP32-S3 | GPIO42 | NC | GPIO35 | GPIO34 | GPIO33 | GPIO38 | GPIO37 |
SDCard
| SDCard | SCK | MOSI | MISO | CS | Power EN | Insert Detect |
|---|---|---|---|---|---|---|
| ESP32-S3 | GPIO35 | GPIO34 | GPIO33 | GPIO21 | ||
| XL9555 | GPIO14 | GPIO12 |
Audio
| ES8311 | WS | SCK | MCLK | DATA-OUT | DATA-IN |
|---|---|---|---|---|---|
| ESP32-S3 | GPIO18 | GPIO11 | GPIO10 | GPIO45 | GPIO17 |
Keyboard & Encoder & Button
| TCA8418 | SCL | SDA | INT | Power EN | RESET |
|---|---|---|---|---|---|
| ESP32-S3 | GPIO2 | GPIO3 | GPIO6 | ||
| XL9555 | GPIO10 | GPIO2 |
| Encoder | A | B | Center |
|---|---|---|---|
| ESP32-S3 | GPIO40 | GPIO41 | GPIO7 |
| Button | Pin |
|---|---|
| ESP32-S3 | GPIO0 |
NFC
| ST25R3916 | SCK | MOSI | MISO | CS | INT | Power EN |
|---|---|---|---|---|---|---|
| ESP32-S3 | GPIO35 | GPIO34 | GPIO33 | GPIO39 | GPIO1 | |
| XL9555 | GPIO5 |
Sensor
| TCA8418 | SCL | SDA | INT |
|---|---|---|---|
| ESP32-S3 | GPIO2 | GPIO3 | GPIO8 |
| DRV2605 | SCL | SDA |
|---|---|---|
| ESP32-S3 | GPIO2 | GPIO3 |
| BQ27220 | SCL | SDA |
|---|---|---|
| ESP32-S3 | GPIO2 | GPIO3 |
| BQ25896 | SCL | SDA |
|---|---|---|
| ESP32-S3 | GPIO2 | GPIO3 |
GNSS
| MIA-M10Q | TXD | RXD | PPS | Power EN | RESET |
|---|---|---|---|---|---|
| ESP32-S3 | GPIO12 | GPIO4 | GPIO13 | ||
| XL9555 | GPIO4 | GPIO7 |
LoRa
| SX1262 / SX1280 | SCK | MOSI | MISO | CS | INT | RESET | BUSY | Power EN |
|---|---|---|---|---|---|---|---|---|
| ESP32-S3 | GPIO35 | GPIO34 | GPIO33 | GPIO36 | GPIO14 | GPIO47 | GPIO48 | |
| XL9555 | GPIO3 |
Expand(XL9555)
| XL9555 | SCL | SDA |
|---|---|---|
| ESP32-S3 | GPIO2 | GPIO3 |
External scoket(Adaptation nRF24L01)
| FUNC | SCL | SDA | MISO | SCK | TXD | |
|---|---|---|---|---|---|---|
| PIN | GPIO2 | GPIO3 | GPIO33 | GPIO35 | GPIO43 | GND |
| PIN | 5V | XL9555 IO9 | GPIO9 | GPIO34 | GPIO44 | 3V3 |
| FUNC | CE | GPIO | MOSI | RXD |
Dimension Diagram
Schematic
Datasheet
Software Development
FAQ
Q. How to choose between different versions of T-LoraPager? A. Choose LoRa module according to application requirements: SX1262 for long-distance communication, LR1121 for multi-band support, CC1101 for low-cost Sub-1GHz applications.
Q. What to do if the device cannot flash the program? A. Ensure USB CDC On Boot is enabled, and hold the BOOT button while clicking RESET to enter download mode.
Q. GPS positioning is slow or no signal? A. Ensure use in outdoor open areas, and check if the antenna connection is good.
Version History
| Version | Release date | Update description |
|---|---|---|
| V1.0 | 2024-08-05 | Initial Version |
Related Tests
Power Consumption Tests
| Mode | Wake-Up Mode | Current |
|---|---|---|
| DeepSleep | BootButton | 530uA |
| DeepSleep | Timer | 530uA |
| LightSleep | BootButton | ~2.26mA |
| Power OFF | PowerButton | 26uA |